
Cropping an image in PowerPoint is simple: select the picture, open Picture Format > Crop, drag the black crop handles inward, reposition the picture inside the frame and press Esc. The difficult part is not finding the command. It is keeping the image proportional, choosing the right part of the photograph and making several pictures look consistent.
This guide covers the complete native PowerPoint workflow first. At the end, you will also see how Crop to Slide and Fit to Slide in MLC PowerPoint Add-in can shorten the same process when it becomes a recurring task.
How to crop an image in PowerPoint
- Select the picture on the slide.
- Open the Picture Format tab.
- Select Crop.
- Drag a black crop handle to remove the unwanted area. The shaded parts are hidden when you finish.
- Drag the picture itself if you need to reposition the subject inside the crop frame.
- Press Esc or click outside the picture to apply the crop.
The black crop handles and the normal white resize handles do different jobs. Black handles change which part of the image is visible; white handles change the size of the image or its frame. Confusing the two is one of the most common causes of stretched or badly composed photographs.
The rule that prevents distortion
Do not drag a side resize handle just to make a photograph fit a different proportion. That squeezes or stretches the pixels. Crop the image instead, or resize it from a corner while its aspect ratio is locked.

A distorted face, product or logo is immediately noticeable. It also communicates that the slide was assembled rather than designed. Cropping solves a different problem: it changes the composition while keeping the visible image proportional.

Before you crop, decide what the picture must do:
- cover the whole slide as a background;
- fit completely inside a frame;
- become a circular portrait or another shape;
- create a consistent row with several other photographs;
- remove an unwanted area without changing the picture’s overall size.
The correct method depends on that purpose.
How to resize a picture without stretching it
If the picture is too small or too large, select it and drag a corner handle. In current PowerPoint versions, the aspect ratio is normally locked for pictures; you can also verify Lock aspect ratio in the Format Picture pane. Avoid pulling only the left, right, top or bottom resize handle unless distortion is intentional.
The original version of this tutorial used the traditional Shift + corner drag method. It is still useful when working in older Office environments or when you want an explicit constraint, but the key principle is unchanged: resize proportionally from a corner, then crop the composition.


How to crop a picture to fill a 16:9 slide
A full-slide photograph is where small inaccuracies become most visible. The image has to reach all four slide edges without being stretched and without leaving white bands.

First check the presentation format under Design > Slide Size. Most current presentations use Widescreen (16:9); older decks may use Standard (4:3).

Then use this workflow:
- Place the picture on the slide and resize it proportionally from a corner until it covers the slide area.
- Select Picture Format > Crop > Aspect Ratio > 16:9. Choose 4:3 instead if that is the actual slide format.
- With Crop still active, move the picture inside the frame until the important subject sits in the right position.
- If necessary, adjust the crop frame so its edges coincide with the slide edges.
- Press Esc and inspect the result at full-slide size.


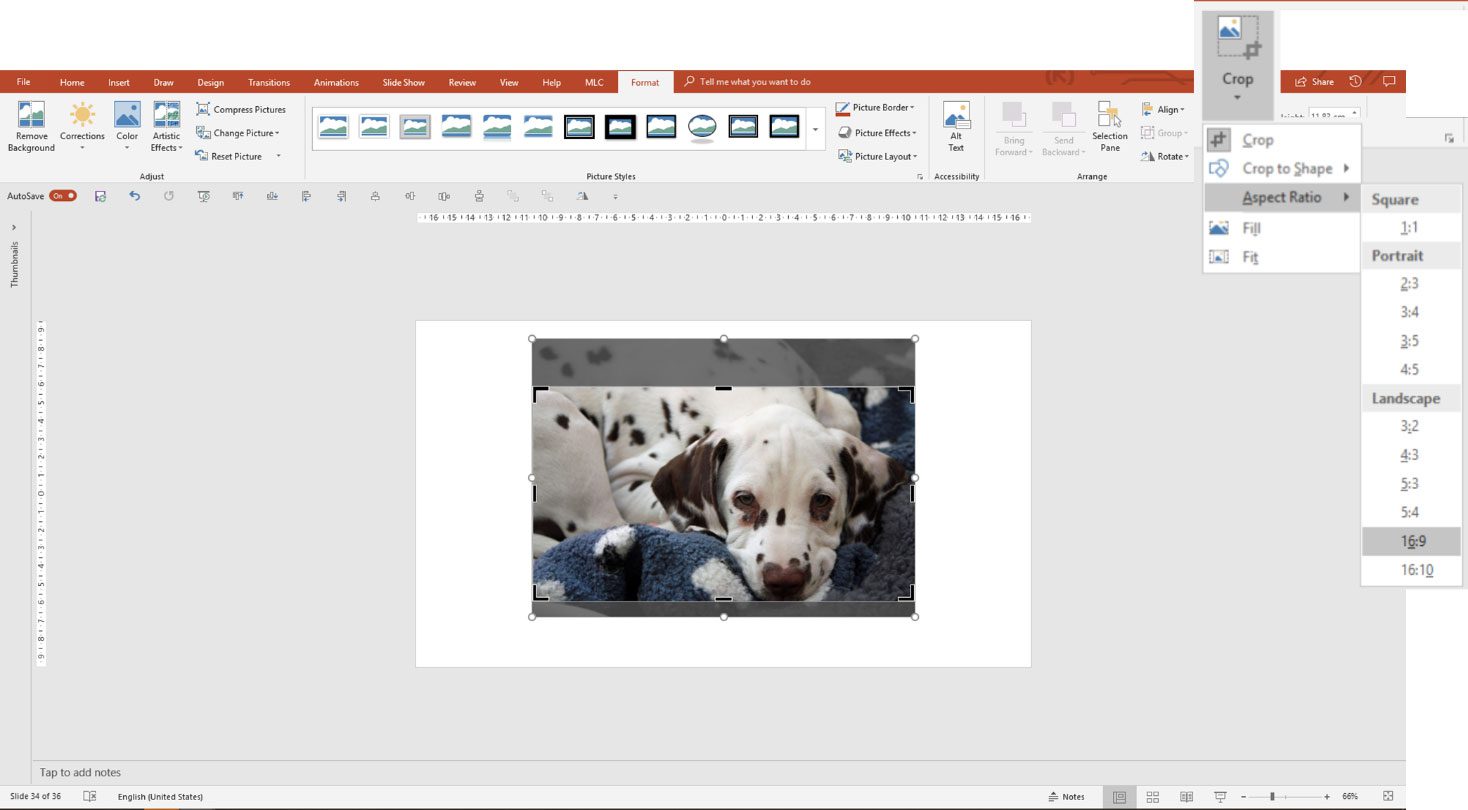
The legacy MLC method shown in the screenshots uses the slide centre as a reference, applies the correct aspect ratio and then adjusts the crop diagonally. Holding Ctrl while dragging a crop handle crops parallel sides equally; combining the constraint with a diagonal corner makes it easier to keep a centred 16:9 frame. The exact keyboard behaviour can vary by PowerPoint version, so the reliable test is visual: all four crop edges must match the slide and the photograph must remain proportional.

Do not judge only the edges. Check the focal point as well. A technically perfect full-bleed crop can still be weak if a person is cut at a joint, the product is too close to the edge or the text area has disappeared.

Fit vs Fill in PowerPoint
Fit and Fill both preserve the original proportions, but they solve opposite layout problems.

| Command | What it does | Best used when | Trade-off |
|---|---|---|---|
| Fit | Shows the entire image inside the frame | Every part of the picture must remain visible | Empty space may remain on two sides |
| Fill | Covers the entire frame with the image | The frame or slide must have no empty bands | Part of the picture may be cropped |
Use Fill for full-slide backgrounds, photo cards and consistent image grids. Use Fit for screenshots, charts, diagrams or product images where losing an edge would remove information.
If Fit leaves white space, it is not malfunctioning: the image and frame have different proportions. If Fill removes an important face or label, keep Fill active and reposition the picture inside the frame, or use a different source image with a more suitable composition.
Reposition the focal point after cropping
Cropping is not complete until the subject is placed deliberately. With Crop active, drag the photograph—not the black handles—to move it inside the fixed frame. The dimmed area shows what PowerPoint will hide.
For portraits, leave enough space around the head and avoid cutting exactly at the chin or joints. For a slide with text, position the subject so that natural empty space remains behind the text block. For products, keep the part that distinguishes the product clearly visible rather than centring the object automatically.
This is also where the rule of thirds can help. The main subject does not always need to sit at the geometric centre; an off-centre crop can create space for the message and make the slide easier to scan.
How to crop a picture to a shape
- Select the picture.
- Choose Picture Format > Crop > Crop to Shape.
- Select a circle, rounded rectangle or another shape.
- Open Crop again to move or scale the picture inside the shape.
- Use Aspect Ratio > 1:1 first if you need a true circle rather than an oval.
Shape crops work well for team portraits, testimonials and small visual accents. Keep the same shape and size across the slide. Mixing circles, rounded rectangles and freeform crops without a reason usually makes the layout less coherent.
How to crop several pictures to the same size
The fastest native method is to design one correct frame and reuse it:
- Crop the first picture to the required proportion and size.
- Duplicate that framed picture.
- Use Change Picture to replace the image while preserving the frame.
- Open Crop and reposition each new subject.
- Select all frames and use Align and Distribute.
Consistency comes from more than equal dimensions. Compare the apparent scale of faces or products, the amount of space above each subject and the visual weight of every photograph. Different source orientations can work together if the frames, margins and focal-point treatment are consistent.
Image quality: cropping cannot create detail
Cropping removes pixels from the visible composition; it does not increase resolution. If a small photograph is enlarged to cover a full slide, it may become soft even when the crop is technically correct.
When an image looks blurry, check three things:
- Source resolution: start with a larger original whenever possible.
- Enlargement: avoid scaling a small image far beyond its original dimensions.
- Compression: repeated exports, re-imports and PowerPoint compression can reduce detail.
Complete the visual review before compressing the deck. Replacing a poor source is usually more effective than trying to rescue it through further cropping or sharpening.
If you still need appropriate source material, use the MLC guide to finding free images for PowerPoint presentations.
Privacy and file size: cropped areas may still be in the file
PowerPoint normally hides cropped regions rather than removing them from the underlying presentation. This is convenient because you can reopen Crop and change the composition later. It can be a problem when the hidden area contains confidential information or when many large images make the file unnecessarily heavy.
Once the crop is final, use Picture Format > Compress Pictures and select Delete cropped areas of pictures if you need to remove those hidden regions. Work on a copy when future recropping might be required, because deleting cropped areas is intended to be permanent.
Microsoft’s official picture-cropping guidance documents both the standard crop controls and the option to delete cropped areas.
Common crop problems and how to fix them
The picture looks stretched
Undo the resize, restore the original proportions and resize from a corner. Use Crop, Fit or Fill to change the visible composition instead of forcing the image into the frame.
White bands remain around the picture
The picture was fitted inside a frame with different proportions. Use Fill, or choose the slide’s aspect ratio and reposition the subject.
Fill cuts off the important part
Open Crop again and drag the picture inside the frame. If the subject cannot fit without creating a weak composition, use a different image or a less aggressive frame.
The crop handles are not visible
Make sure a picture—not a shape or placeholder—is selected, then open Picture Format > Crop. If the image is inside a placeholder, clicking again may be necessary to select the picture itself.
Several photographs still look inconsistent
Match their frame size and aspect ratio first, then compare subject scale and headroom. Finish with Align and Distribute; equal outer dimensions do not automatically create equal visual weight.
A faster workflow with MLC PowerPoint Add-in
The native PowerPoint method above is enough for any single image. The productivity opportunity appears when the same cleanup repeats across a deck.
MLC PowerPoint Add-in provides two relevant commands:
- Crop to Slide trims supported photographs and icons that extend beyond the slide boundary.
- Fit to Slide resizes an image to cover the slide while preserving its proportions; you can then adjust the visible area with PowerPoint’s native Crop command.
The commands do not decide the composition for you. You still need to check the focal point, legibility and image quality. Their value is removing the repetitive edge-by-edge setup before that design decision.
Watch the existing MLC tutorial: Crop to Slide + Fit to Slide.
If cropping images to slides is part of your weekly workflow, explore the MLC PowerPoint Add-in. The individual plan is EUR 149 per year, the Add-in runs on Windows, and a 7-day trial is available.
CROP AND FIT IMAGES FASTER
MLC PowerPoint Add-in automates recurring cleanup while you keep control of the composition.
Frequently asked questions
How do I crop a picture in PowerPoint without stretching it?
Use Picture Format > Crop and drag the black crop handles. To resize the whole picture, use a corner handle while keeping the aspect ratio locked. Do not force a new proportion with a side resize handle.
What is the difference between Fit and Fill?
Fit shows the complete picture and may leave empty space. Fill covers the complete frame and may hide part of the picture. Both preserve proportions.
How do I make a picture fill the entire PowerPoint slide?
Check the slide size, choose Crop > Aspect Ratio > 16:9 for a widescreen deck, then use Fill or resize proportionally until all four slide edges are covered. Reposition the subject before confirming.
Can I crop a picture into a circle?
Yes. Choose Crop to Shape > Oval and use a 1:1 aspect ratio to create a true circle. Reopen Crop to centre the face or subject.
Does PowerPoint delete the cropped part of an image?
Not by default. The hidden area normally remains in the file. Use Compress Pictures > Delete cropped areas of pictures after the crop is final if privacy or file size requires permanent removal.
How do I crop several pictures to exactly the same size?
Create one correct frame, duplicate it, replace each picture and adjust the crop position. Then use Align and Distribute. This preserves consistent outer dimensions while allowing each subject to be composed individually.
Why does my cropped picture look blurry?
The source image is probably too small, has been enlarged too much or has already been compressed. Cropping cannot add resolution, so use a larger original where possible.
Keep learning
- Find and use free images for PowerPoint presentations
- Compare three PowerPoint add-ins for different workflows
- Try MLC PowerPoint Add-in for 7 days
Download the PDF guide
Get the formatted version of this guide and keep it available while you work on your slides.


Comments on How to Crop Images in PowerPoint Without Distortion