DON’T HAVE TIME TO READ THE ARTICLE? DON’T WORRY, LET ME SEND YOU A COPY
Did you know you can add additional functionality to PowerPoint using a MLC PowerPoint Add-in? Let me illustrate why this is important and how it could save you a significant amount of time.
Imagine, you must create one or more virtual presentations for an approaching event. You do not have much time and work is pressing.
The presentations always come as something more to do compared to the work.
In fact, if you have assistants, usually the dirty work will touch them because they will see the delegates presentations.
Nevertheless, you have resources that are allocated to making presentations, they cost and I’m sure you’re hesitating how effective they are in PowerPoint.
Whether is you or one of your reporters, it does not matter, waste of time making presentations costs, and doesn’t help anyone.
What does the ability to be super efficient in making PowerPoint presentations depend on?
I remember that my first employment contract, just after graduation, was in an international consultancy company based in Paris.
The first days I went into the office with my head up and ready to break the world. You feel ready and you want them to immediately assign the first tasks to prove your value, but in my case things went differently.
In fact, consulting firms are known for being oriented towards maximum efficiency in the use of their resources, after all, it is on the time of their consultants who do business.
Specifically, I remember that one day they told me: “unlike the industry, our product are the presentations we make, because they will guide our customers.”
Do you begin to understand the importance of these PowerPoint documents?
For this reason, I spent my first week of work doing what they had called a side-by-side.
It was about sitting next to a colleague with more experience and watching him work in PowerPoint. Initially I felt it touched my pride, and I thought to myself: “do they think I don’t know how to work with PowerPoint?”.
After that week I realized that they really thought that I did not know how to use PowerPoint and well, they were right.
That team was a slide factory and efficiency was their religion!
Today, after 10 years, I still use some of their teachings, although I think that efficiency effectiveness was often compromised.
What does it mean?
I’ll explain it in simple words: efficiency means making slides quickly, effectiveness means making slides that work and that affect the audience.
It is said that there is a trade off between effectiveness and efficiency, that is that as one grows one decreases the other. I believe that a good presentation can be obtained when it is possible to optimize the relationship between efficiency and effectiveness.
10 years ago I was probably unbalanced about efficiency. With the Lean Presentation Design I brought balance in the way of making presentations.

Therefore, I aimed to be extremely fast but never to the detriment of the quality of my slides.
Let’s get back to us.
Do you know what is the first thing I noticed in my colleague’s PowerPoint window?
A clearly made Quick Access Toolbar.
Like mine today, I show you:

If you want to know how to set and for what reason you are under the ribbon (i.e. under the main menu bar with all the PowerPoint options) then I’ll let you read the relevant paragraph in the PowerPoint hack guide.
A little while ago I told you that my QAT is rigged, have you already understood why?
Because there are non-standard PowerPoint buttons.

Did you notice them?
Those buttons are the result of study and analysis of long PowerPoint sessions and have the ability to completely change the way we work in PowerPoint.
It is precisely those little buttons, plus some others that I have not shown yet, which allow me to be even faster than my colleague in consulting many years ago.
First I told you that he too had the make-up QAT, so what’s the difference between mine and his?
Actually, he also had custom functions because the major consulting firms develop add-in internally, based on their specific needs to standardize and streamline presentations all over the world.
These add-ins are clearly reserved for employees and in fact, after getting used to a certain way of working, when I left that reality, my efficiency was affected.
So, over the years, I started my add-in that begun from some of the features we had in consulting, abandoning specifically all those that have no use for those working in other realities, adding a touch of personality.
What do I mean? ?
I replicated the same process of the first week of work, I dedicated myself to observe the others who work in PowerPoint and I took notes, but this time for 4 years!
I studied the recurring activities that make people who work with PowerPoint lose more time and have developed specific functions for each of them.
The MLC PowerPoint Add-in is born.

In fact, since it was born, it is constantly developing, thanks to the evolution of PowerPoint, the way of working, the needs of operators and feedback of our users or my team that makes presentations for customers all over the world, daily basis.
Many of you asked me for a guide to use add-in. With this article, I suggest you to go beyond a simple instruction booklet and show how I use these features in real cases.
I will show you how each function works and also the combos of functions in situations where you may find yourself in the daily life of your presentations.
Swap Shapes with the PowerPoint Add-in
The historical function of the MLC PowerPoint Add-in has always been its battle horse!
One day working on a presentation for a client I found myself having to solve a problem as simple as it was arduous.
What am I talking about?
I had made a team slide with pictures of the names and positions within the project. I build a simplified version to make you understand the point.
So, I’m introducing a team of 6 people with basic information and a picture of them.

As you can see team members are lined up in a 3×3 grid and are well distributed. So, once you are positioned you must be very jealous of the points where you put them.
What if, however, you have exchanged the photo of the first in the upper left with the last in the lower right corner because a misunderstanding and you find yourself having to swap positions?
Doing it by hand would require several steps: you should take the first, move it on the second, make sure it is aligned with the first and with others, vertically and horizontally and then move it into the background, so you can easily take the first and repeat the operation at the last position.
You missed?
I would have lost myself too, it’s normal!
Swap Shapes serves exactly this, in one click it allows you to invert the position of one object with another.
In the following image I have highlighted the two avatars of which we have reversed the position and left the others gray in order to make the passage comprehension immediately.

So Swap Shapes reverses the position of two objects in PowerPoint allowing you to preserve alignments and distributions.
Here is a video, where you can see in action how easy and fast is to swap shapes using our Add-in:
Use the PowerPoint Add-in to Easily Make Objects the Same Size
The second historical function of the MLC PowerPoint Add-in, Same Size, allows to uniform the dimensions of two objects or images.
To create the previous slide, I got several icons that could have different sizes

The icons are a powerful graphic tool that greatly simplifies the presentations, I let you discover how to use them in the Guide to icons in PowerPoint.
To compose the team slide you need the avatars to have the same size, how?
If you do it by hand you should select one, mark the reference dimensions, select all of them and apply them by writing them directly in height and width.
Alternatively, I suggest you first select the shape from which you want the others to take the dimensions

Select the others, to which you want to apply the dimensions of the first one

and try the Same Size button.

You will see that all the icons have been resized based on the size of the first one you selected.
As I said before, the Same Size in PowerPoint has the ability to recognize if it is resizing an object or an image and always give you the best result.
In fact, try to place two images of different sizes on a slide.

How do you make the dimensions of the two images uniform? That is, if you wanted to apply the dimensions of the right image, to the left one, how would you do?
The question is a fairly common need in PowerPoint but the answer is not simple at all.
Why?
Simply because the images have proportions that must be respected, so you don’t just pull the white handles and resize the photos, so there are cropping functions.
In PowerPoint you can get incredible results working with images, if you’re interested in the topic I let you read the image guide in PowerPoint. Now let me show you how to make the size of two images in PowerPoint uniform.
First select the image from which you want to take the dimensions and then the one to which you want to apply them (they can be more than one).

I select the other image:

Now I use the Same Size button:

The image of the stripped leaves has taken on the dimensions of the first selected image. The sensational thing is that the two images now have the same proportions and neither has been deformed, don’t you find it brilliant?
You can apply Same Size function not only to icons and pictures, but also to shapes, text boxes, tables and even to the combination of all these at once! Don’t believe me? Watch the following video:
Easily Create Grid Shapes
The first version of the MLC PowerPoint Add-in released to the public contained 3 functions only, including the first two and the Grid Shapes.
To explain it, I restart from the last screen of the previous example and I ask you a question: how do you distribute the avatars you have just redimensioned in a 3×3 grid with a precise distance between the icons?
Doing it by hand requires several steps and there may be more ways to do it.
With Grid Shapes you can build the grid in one step, I’ll show it to you.
Select all the shapes you want to distribute along the grid.

Click on the Grid Shapes and look at the window that opens:

Set 2 rows, 3 columns and 10px for both vertical and horizontal space:

And here is the grid is built.
At this point, to complete the slide I suggest you create a name text box and a job title below the first avatar:

Select the two text boxes and use the quick duplicate technique that I explained to you in PowerPoint hacks Guide, dragging while holding CTRL + SHIFT:

Once deposited you are ready to unleash the strength of the CTRL + Y to repeat the last action:

Now you just have to select them all and drag them down while holding down CTRL + SHIFT, the first to duplicate, and the second to constrain the movement to the vertical (see the guide to PowerPoint Hacks to discover all the potential of this technique).

In this case I combined a function of the MLC PowerPoint Add-in with one of the PowerPoint hacks that I showed you in the guide, referenced previously to quickly create a grid that could have taken much longer and risked being inaccurate.
Consider that every time you introduce manual adjustments, you will most likely introduce inaccuracies. Thus, these steps will save you time both for implementation and for corrections.
Combo Swap Shapes / Same Size
As I said, some features can be used together to maximize the yield of some steps.
For example, imagine having to replace an avatar within the previously built team slide.

Find the avatar (I refer you to the ultimate Guide to PowerPoint icons presentations to learn how to use them correctly), insert it into the slide and immediately notice that it is bigger than the others.

To resize and position it, just select the avatar you want to replace first:

Select the new avatar and click on Same Size:

Since the selection is still active on both, you can use the Swap Shapes to replace the old avatar in the grid:

Now deselect the avatar in the grid and press the delete button on the keyboard to remove the other:

Erase all elements
Function as simple as powerful.
Allows you to clean a slide from all the elements in just one click.

There are several fields of application. For example, I use it a lot when I use PowerPoint to make a quick graphic, like an infographic or a graphic for the blog or for some article in general.
I would prefer that you take care not to delete the PowerPoint slide master placeholders with this function.

Placeholders are fields to be managed gently through the slide master and should not be mistreated, as is often seen doing because they ruin the relationship between the presentation and its master, making you lose efficiency.
If you don’t know what I’m talking about then you’re not really exploiting the potential of the slide master and you’re therefore losing more time than you imagine in your presentations.
The slide master is not the subject of this guide, so I’ll let you read the appropriate guide to learn more about the topic and maximize your efficiency – The Complete Microsoft Slide Master Tutorial
Copy-Paste to Active slides
There are situations when you have to insert an object to a lot of slides. And you might think that using a Slide Master is the best solution.
But what if that object should have a different positioning on each slide? A different size or color? What if, in the end, this object should not be on all the slides in your presentation, tho still on the majority of them? Do you still think about the Slide Master?
I don’t. I’m using Copy/Paste to Active slides function.
Let’s have a look on the example below. We need to copy the Chapter box to all the slides with book photographs. First, we select the object (or several objects) and click “Copy to Active Slides“.

Afterwards, we select the slides, which we want to paste our object to and click “Paste to Active slides“.

As you can see, now we have the copied object on all the selected slides.

Now you can easily change the number of chapters to have a logical sequence.

Copy-Paste to Active Slides is a very powerful and widely used feature by users of the MLC PowerPoint Add-in.
Can you imagine how helpfull this finction will be, if you have to copy/paste an object not to a few slides, as we did now, but to an impressive number of slides in your presentation?
In the following video you can lean how to use Erase all Elements and Copy-Paste to Active Slides functions of the MLC Add-in.
Rectify lines
Do you ever draw lines in PowerPoint and draw them crooked?
By crooked it means that are they inclined respect to the horizontal axis.

Don’t they bother you at the sight? I can’t even look at them!
In these cases the Rectify Lines is a very precious friend because in just one click it allows you to straighten out all the lines.

This function serves on those occasions when you have more lines already drawn and maybe even positioned on the slide and you want to rectify them all together.
I would not want you to think of it as a convenience for not drawing straight lines.
How do we draw straight lines?
When you draw a line if you hold SHIFT pressed, the mouse will be constrained to one of the axes: vertical or horizontal or it will allow you to draw a line inclined by 45 °.

Check yourself!
Advanced Distribution
PowerPoint has two distribution functions: vertical and horizontal.
I have noticed that they are often confused with alignment functions but actually play a different and often complementary role.
What are the default PowerPoint distribution functions for?
They are used to uniform spaces between multiple objects.
Imagine having three squares on a slide, aligned with each other and arranged horizontally.

Do you see that the distance between A and B is different from that between B and C?
This means that the shapes are not distributed between them.
If you wanted to distribute them you could use the Distribute Horizontally button.

Being very used buttons, I keep them in the Quick Access Toolbar of PowerPoint (learn to set the QAT to go even faster with PowerPoint in the Hack Guide) so you always have them at your fingertips.

When you click it you will see that the squares will redistribute to keep the same distance between them.

The distribution worked as expected but how to manage now the case in which you want to increase or decrease the space between the shapes?
The standard PowerPoint distribution functions do not allow you to set the value for the space between them.
From this need arises the Advanced Distribution button of the MLC PowerPoint Add-in that allows you to set the distance you prefer between the forms.
The Advanced Distribution function opens a window that allows you to adjust the distribution with the arrows, increasing or decreasing it.

Or to directly set the value you prefer by typing it on the keyboard.

The Advanced Distribution button works both horizontally and vertically and you can see it right now:
Merge Text / Split Text
The historical and unique functions of the MLC PowerPoint Add-in are recognized for their usefulness but often not immediately understood.
What am I talking about?
If you have used them you will know that to appreciate its power you have to make some passages, but if you’ve never tried them, keep reading because I’m going to explain it to you.
Suppose we start from a bulleted list, do you ever get them on your presentations?

The question was rhetorical!
Bulleted lists are now present in most presentations. Of course, they are always better than a full text slide, at least they introduce a minimum of differentiation at the reading level if the indentation is used correctly.
Nevertheless, we have to admit that the bulletins are not effective, they stimulate the reading and therefore make you lose the attention of the audience.
The complete resolution of a bulleted list requires the combination of different Lean Presentation Design techniques.
Our MLC PowerPoint Add-in allows you to apply this technique at a speed that would otherwise not be possible.
How?
To make the contents of a slide such as usable, the first step is to remove the bulleted list and divide it into sub-groups, perhaps translating the reading order from vertical to horizontal.
To unpack the text box you can use the Split Text function.

Do you see that every text box is now independent? By doing it by hand you would have to copy and paste each text out of the box, one at a time.
Now that you have freedom of movement, it is easy to design layouts that allow you to maximize the effectiveness of the bulleted list.
I, for example, would have redesigned it like this:

No, there is not a bit of creativity behind this design, it’s just about technique and reasoning. This is why Lean Presentation Design can be applied by everyone and especially by us who come from the business and we do not have a mind trained in design.
Are not you convinced? Read – Neuro Presentation Design: How eye path control can dramatically improve your presentations.
To complete our discussion of these two features we need to comment on the Merge Text function, which works opposite to the Split function.
In case you have broken down a text box and want to reassemble it, just use the Merge button to restore the initial conditions.
I select the three titles, for example.

Then i click on Merge Text and set them together in the same text box.

The Merge Text function works with any text box, it doesn’t need to have been previously separated with the Split Text function.
I invite you to see how efficient these two functions are in reality:
Same Height / Same Width
Two buttons extremely simple to use and super useful.
The Same Height and Same Width functions allow you to even out the height or width of two or more objects in PowerPoint.
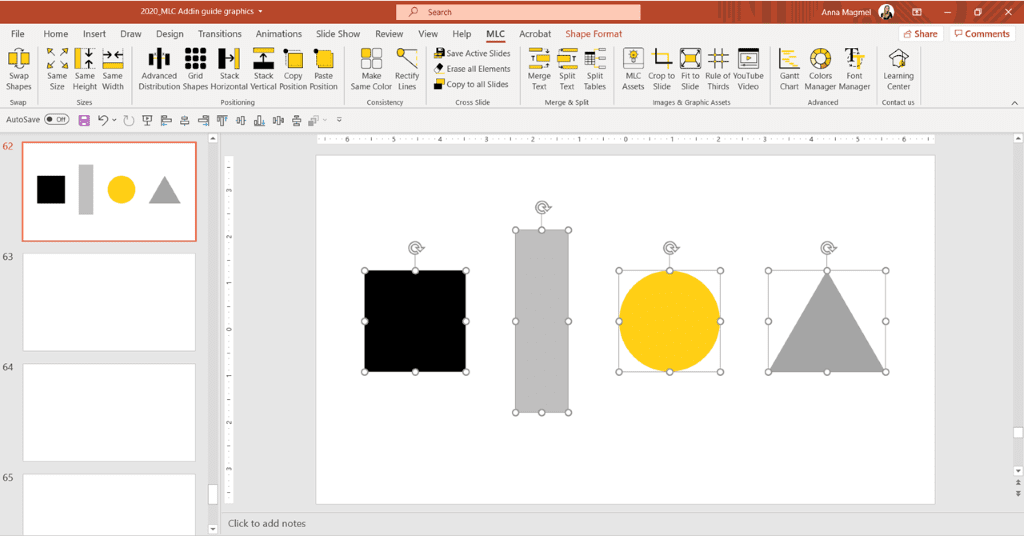
Imagine having a slide with four shapes of different heights and you want to make them uniform with respect to the first one selected.

Just use the Same Height button to get the result in just one click.

If instead I wanted to work on the widths:

It would have been enough to select the shapes (keep in mind, that first should be selected the shape whose width you want to apply to others) and to click on the Same Width button.

In the video below you can see that Same Height and Same Width could be applied not only to the shapes, but also to text boxes, photos, icons, tables and combinations of all of them:
Stack shapes in PowerPoint
The Stack functions let you stack objects vertically or horizontally. They practically bring the objects close to each other by eliminating the space between them.
If you use the Advanced Distribution and put the values of space between the objects to zero, you would get the same result. But only in case of using Stack functions you get it in one click and without typing any number.
Let’s start again from the slide used in the previous paragraph:

Select all shapes and then try the Horizontal Stack:

Now let’s rearrange it, so we see the Vertical Stack:

I select everything, and I click on the Vertical Stack:

Now the shapes are stacked vertically.
I often find myself using these functions in conjunction with the function that breaks up the tables into shapes we’ll see in a few paragraphs.
In fact, when you break down a table, you can find yourself with numerous lines and columns that become objects to be managed and the stack functions let you make order quickly and accurately.
You can find an extended application case in the article – article on the tables.
Now I leave to your creativity the practice of these functions, after watching the video about Stack Functions. Although, I would also like to discover new and original uses of the functions we are creating. So, if you want, comment here or in the community reserved for users of MLC PowerPoint Add-in.
Save Active Slides
You know the situation, when you need to extract a couple of slides from a presentation to be able to share them with a boss or colleague without having to send the whole presentation?
The only way to do it manually is to create a new empty presentation and then copy and paste the slides being careful to copy the format otherwise you risk losing the slide master (discover the slide master in PowerPoint).
With Save Active Slides you can extrapolate the selected slides! We make a test by selecting three slides:

After saving the presentation on Desktop, I open it and find the three slides I saved exported with the original format.

Save Active Slides is a simple and widely used feature by MLC PowerPoint Add-in users for their convenience. Need a bit more of explanation? Check the video:
Make Same Color
Make Same Color is a button extremely simple to use and smart. The Same Color function allows you to make the same color of a lot of objects in PowerPoint.
For example, imagine having a slide with four shapes of different colors and you want to make them uniform:

If you want to standardize the color of your shapes, the first thing to do is: press CTRL + click on the mouse and start clicking the target color shape first.
In this case I clicked on the black shape first.
Now, just press on the Make Same Color button to get the result in just one click:

In the following video you can see that Make Same Color function is not only for shapes… for what else? Check it out yourself:
Split Tables
Another function that will be super effective is that of “split tables”. With this function you can easily divide tables.
The first step to do is creating a table.

Then just select it with cursor.

Finally, click on Split Tables button.

Learn more about how to create effective PowerPoint Tables just clicking here.
Moreover, watch the explanatory video to see some more benefits of using Split Tables function of MLC PowerPoint Add-in:
Gantt Chart
Gantt charts are widely used in project management across all industries and organizations. Nowadays I’d consider it as a best practice to keep everything on track.
However, how tought is it to design and, most important, to update a Gantt chart in PowerPoint?
This feature is was specifically required by one of my clients in Management Consulting, and it is designed to create and update Gantt charts very quickly, without having to create them in other programs.

When you click on the Gantt Chart button in the MLC Add-in ribbon, the window opens up and shows a series of options for creating your customized chart.

As soon as you open the window, you are in the tab called “Task”, where you can create your activities simply by writing the name, and defining the start and end date.

You can select the date with a simple click from the calendar, or enter it by writing in the window, respecting the format. I prefer to select it from the calendar directly!
You can also choose different colors for the activity to distinguish groups of activities from others.


Now you can choose the time base of the timeline, according to your needs:

At this point, if you want, you can set up your milestones which are not activities which have a beginning and an end, but a specific moment in time when, for example, a delivery is expected.

Now press “OK” and you will have created the Gantt graph with the specifications indicated.

As you know Gantt charts represent the progress of a project, hence they require to be constantly updated with new milestones, new tasks or just with an update of the moment in time in which the project is presented.
Without such a tool you would need to add new tasks manually and every time rework on proportions. This would be extremely time consuming and would finally make you prefer to work on excel than in PowerPoint.
However, you would always finally import your chart from Excel to PowerPoint for your presentation and this would be one more step to do.
With MLC PowerPoint Add-in you can always edit your Gantt chart through the easy to follow process adding tasks and milestones and the tool will reproportion the chart for you.
Learn everything about Gantt charts in the the definitive Guide to create a Gantt chart in PowerPoint.
Do you begin to understand how much rework you will skip?
Rule of Thirds
The rule of thirds is a very important feature that allows you to organize and schematize your slides, inserting the right amount of text and making them appealing.
But before a quick explanation! If you press the button “Rule of Thirds” you will see dotted lines.
The magic of this button is that it automatically generates the PowerPoint guides in the right position to identify the 4 intersection points.
Why did I include this weird function in the MLC Add-in?
Keep reading below the explanatory video.
The 4 points of intersection of these lines are called Power Points and their importance is due to their power to attract the eye of the reader before any other element on the slide.

So, the Power Points mark the places where you should insert the core of your slides.
For example, in the slide below you can use the left-hand side Power Points to focus the attention on the subject while you can put the text message on the top right side.

The rule of thirds is as simple as powerful because it leads you to place contents effectively on your slides.
The use of the Power Points is surely the most famous way to take advantage of the rule of thirds, but it is not the only one.
This golden rule has a strategic effect that supports you every time you need to design a new slide layout and allows you to save an enormous amount of time.
I believe that the rule of thirds is such an important topic that I dedicated a full guide to it. If you want to learn how to leverage this rule, just go and read, I’m sure you’ll be amazed about how it will change the way you see your slides: the only golden rule for creating an effective presentation in powerpoint.
MLC Assets
MLC Assets is a constantly updating function, where the latest innovations of the MLC PowerPoint Add-in are included. With this new feature you will further speed up the realization of your slides.
So far, there are 4 main sections. Let me take you through all of them one by one. In fact, the first step is to click on the MLC Assets button:

IMAGES
After clicking on the MLC Assets button, you will see a window on the right side of PowerPoint. The first tab is Images.
Now I will ask you: How many times you found yourself spending hours searching for the right image for your presentations? How many websites you had to look through to find the most suitable picture? And finally, how many times you found the best image and in the end it appeared to be a paid one?
I suppose, the answer might be “Numerous times”. With Images of MLC Assets you will not face this issue again.
We created a platform, where you can easily source images from 3 Free Image Stocks at the same time (Unsplash, Pixabay and Pexels)! Just type the keyword in the search box and click Search / Enter. You will see pages of free high-quality pictures to be used in your presentations.
For example, let’s look for some nice pictures of laptops and check the results.

Just click on the image you like, and it will appear on the slide. Now you can modify it the way you want.

Moreover, if you hover over the image, you will see a little window showing you the origin of it, giving you a possibility to download the high-quality picture from the website.

Now you are ready to use all the images contained in our multimedia library! Feel free to use the images in your presentations as they are free from copyrights and of a very good quality.
With MLC Assets you don’t need Google Images anymore!
BONUS! If, by some reason, you don’t have access to PowerPoint, but you need a free high-quality picture in seconds, you can find a solution on our website! Just go to RESOURCES > Free Stock Photos. Here you are!

MAPS
When creating presentations, our clients often need to insert maps, to show where their stores, factories, offices are located. And again, they, you and I are forced to google free vectors maps, which, most of the times, are not that good and accurate. Moreover, these maps will show you only countries and, maybe, capitals.
So. you waste time googling, inserting vector in your PowerPoint slide, trying to find and highlight the part that you need…
What if I tell you that in MLC Assets you can have a vector map of any country, which you can edit the way you want? Follow me!
Maps are located in the second tab of MLC Assets. You can scroll down and find what you are looking for, or you can just type the name of the country. Let’s try with a map of Italy!

After you found the right map, click on it, so that the map opens in a new slide:

One more thing to assure you how helpful are Maps of MLC PowerPoint Add-in: if you go to Home > Select > Selection Pane, you will find all the Regions named and put in different layers.

Even the tiniest islands will have their Region name and a separate layer. I find it great!
Now you can spend your time customizing the map according to your presentation and not wasting it for finding one! Recolor, enlarge, make things smaller, replace, cut, highlight!

ICONS
The third tab in MLC PowerPoint Add-in is dedicated to Icons. Of course, there are websites with tons of various icons. But you have to escape the PowerPoint to look for it. To avoid this inconvenience, I’m inviting you to use our collection of icons, which we are constantly enriching.
Just type what you are looking for and hit Search / Enter. Let’s look for something “Digital”!

As you can see, there are several options for such a request. Let’s take a laptop from here. Click on it and the icon will appear in the top left corner of your slide:

Now you can edit the icon in any way. Make it suit your presentation! For example, after converting this icon to shape, I recolored even the keyboard of this laptop!

Don’t know how to convert the icon to shape? You can find the answer in my Complete Guide to using Presentation Icons. I am sure, you will find some new information about icons in this article.
Already using our MLC Add-in and did not find the icon to satisfy your needs? Let us know in the comments below and my Team will be happy to create new useful vector icons for you to save time!
You can see how you can use Images, Maps and Icons in the video below:
MY ASSETS
The last, but for sure not least, is My Assets tab.
Who is it made for? Mainly for companies, who have a lot of brand materials. Now I am going to explain to you how My Assets work.
Sometimes, while making a presentation, you need a logo of your company or the logo of your product, your corporate icons or photographs. If you don’t have them, you have to bother your colleagues, asking them for needed materials and then wait until they will get a minute to help you. Managing graphic assets at a corporate level could represent a threat to workforce efficiency.
What if you can have everything you need to design branded presentation for your company, right in PowerPoint?
My Assets is a platform with all your graphic materials, easily accessible straight from PowerPoint!

I will show you the example with MLC Presentation Design Consulting graphic Assets:
- First of all, you will get the latest, official version of the graphic assets of your company in a handful sidebar while working

2. You will always get the highest quality graphic files, like images and photographs

3. You will save time importing the right asset, because it will appear on your slide with a matter of one click

4. You will have an opportunity to use the right format you need for your presentation

As you can see, there will be no need to ask your colleagues anymore!
Using My Assets, you will bring consistency into the way brand is communicated, you will optimize communications and save time at a group level and finally, you will centralize official graphic assets management.
Copy Paste Position
One of the latest MLC PowerPoint Add-in function is Copy Position / Paste Position. As you can guess by the name, with this function you can Copy the position of an object on one slide and place another object on another slide exactly in the same position.
Now you might think “Why do I need to Copy/Paste Position, if I can just make a Slide Master? And create a Placeholder there?” Well, you can! But what if the objects you need to be in the same position are very different, even by dimensions?
Here we are! You really need the Copy/Paste Position!
Let’s imagine, we have two different logos, which should be in the same position on two different slides. So instead of trying to put them more or less in the same place, we can do it precisely and just in few clicks.
Select the first logo and click “Copy Position”.

Now, go to the next slide, select the second logo and click “Paste Position”.

That’s it. No Slide Master, no headache of aligning!

To be sure you got how it works, check the video below!
Crop to Slide
Crop to Slide is a function which helps you to get rid of the unwanted parts of graphics, which are going out of the slide.
We will take an image and an icon using MLC Assets. Select both objects and click Crop to Slide in MLC PowerPoint Add-in ribbon:

Done! Both image and icon are framed within the slide now. No more not needed parts outside the slide.

For now, Crop to Slide works only with photographs and icons.
But can you imagine how much time you save cutting the photo/icon precisely and just in one click!
However, if you still don’t have the MLC PowerPoint Add-in but you want to know how to accurately crop the images, you can read my article on this topic: Crop images in PowerPoint like a Pro.
Fit to Slide
Another MLC PowerPoint Add-in function which will save your time working with images and other objects, is Fit to Slide.
For example, you need to set an image as a background for your slide. So first you enlarge the picture or make it smaller, then you start to crop it manually, pulling the handles. You have to be careful not to distort the image, not to squeeze it, so it remains proportional. Keep an eye on the edges – they have to perfectly fit the slide.
Sounds like an unnecessary waste of time. We can just use Fit to Slide.
Let’s take a picture of plants from MLC Assets.
Select it and click Fit to Slide:

As you can see, Fit to Slide function enlarged the image with cactuses, so it took the whole slide without any empty parts or parts going out.

Want to check how precise it is? Select the image, hold the click of the mouse and try to move the image a bit – you will immediately see thin red lines, which are showing you the markup: the frame and the center of the slide. Is it precise? You tell me!

We just saw how Fit to Slide enlarges the pictures, but what about making it smaller? Let’s try with another images of plants.
You see, the image is much bigger than the slide, right? I will select it and click Fit to Slide.

The function worked, but I’m not very happy with the composition:

What can we do? Simply go to Picture Format > Crop. Here you can set the right part of the image. Just move the visible part of the picture, but there is no need to adjust the size with the handlers.

Look: Much better!

Moreover, Fit to Slide works also with shapes. So, if you need a rectangular to be your full colored background – don’t hesitate to use the MLC PowerPoint Add-in function. The only thing – Fit to slide will make your shape same size as the slide, and afterwards, you will just have to align the shape with general alignment buttons of PowerPoint. Still faster than changing the size of the shape manually, don’t you think so?
Want to see the process of Cropping to Slide and Fitting to Slide even more vivid and clear? Here is an explanatory video for you!
YouTube Video
YouTube video function can be your little savior not only because it saves you time, but also it avoids you getting in an awkward situation. And I will tell you why.
One day I attended an event with several Pitch presentations. I wasn’t the speaker this time, I was a part of the audience. And, as I have mentioned in other article, while presenting, you have to do your best not to lose attention of your audience. But we know – it is very easy: a few mistakes, hitches, delays – the audience is not interested anymore.
So, during the event a participant came up on stage. The beginning of his Pitch Presentation was very catching, his speech was smooth, everything straight to the point, without unnecessary deviations. At some point, this guy arrived to a slide with an inserted video. And guess what? The video was not working, but it was still an important part of his speech.
He escaped the presentation, opened YouTube and started to search for same video online. DONE! Attention of the audience is gone! While the participant was struggling with his issue, the audience took out the phones to check the socials. You can imagine that by the time the video was found online, half of the spectators forgot the first part of the presentation.
Therefore, YouTube Video function was included in MLC PowerPoint Add-in. You can now embed any video from YouTube into your presentation. Let me show you how.
Click on YouTube Video in the MLC PowerPoint Add-in ribbon. Insert (previously copied from YouTube) the link of the video in the pop-up window. Click “Insert Video”.

The video appears on the slide!

Of course, you have to be sure that you will have a decent internet connection in the place of presenting. But this is a matter of being responsible and prepare well for your performance.
Enlarge your inserted video, make it smaller, put several videos on one slide…But don’t waste your precious time escaping the PowerPoint while presenting and searching a video in other sources!
Color Manager
Another time-saving function is Color Manager.
Imagine, after making a long presentation you realize: throughout dozens of slides you were using the wrong color for an element.
If it was a big color difference (for example, you used yellow but had to use red), you can identify the wrong color easily; though, you will still lose time.
But what if you were using the wrong shade of the color? Might not seem a big issue, but if it is a corporate presentation – better not to mess it up! Now you have to go slide by slide, select the element, check its color, find where you made a mistake, and change the colors of a number of elements, meaning: waste hours! NO WAY!
Simply use Color Manager!
Click on the Color Manager button in the MLC PowerPoint Add-in ribbon. On the right side of PowerPoint you will see a panel with all the colors which were used in the current presentation:

Do you see these 4 shades of yellow color? Let’s make it one right shade! Tick the boxes and “Select Color“

You will see a pop-up window, where you can choose a standard color and click OK or you can go to “Define Custom Colors“:

The window will enlarge and in this part you can type the right color code you need, and Add it to Custom Colors.

Click OK and see how 4 different shades of yellow become one! If the magic did not happen – hit Refresh at the top of the Color Manager panel.

I have to say, some time ago even my Team struggled with such a “color issue”, especially when several people had to work on the same presentation. It was one of the reasons, which triggered me to initiate the development of Color Manager function to be inserted in MLC PowerPoint Add-in. Now it saves our time and it can save yours!
Font Manager
Font Manager works in the similar way to the Color Manager. Let’s see together how we can apply it to a presentation with several fonts.

We will start by clicking on the Font Manager button in the MLC PowerPoint Add-in ribbon. On the right side of PowerPoint you will see a list of the fonts used in your presentation.

Click on the font you want to change. In the drop-down menu select the new font OR the one you already used in the current presentation.

Let’s proceed with 3 fonts: Algerian, Curlz MT and Forte, changing them for Segoe UI BLACK. A better visual and consistency appeared on these slides.

Hit “Refresh” for the same fonts to merge in the Font Manager panel.

We have seen an example of changing fonts for a few slides and it already looks useful. Now imagine a presentation with 100+ slides, a lot of text boxes and numerous fonts used? I guess you know what I will say now – you need Font Manager in your PowerPoint life!
Still not convinced? Check the video about how to use Color Manager and Font Manager for a better understanding:
Gift a License
The latest integration in MLC PowerPoint Add-in is a button called “Gift a License”. It’s an easy way to share MLC PowerPoint Add-in with your friends or colleagues.
Just click on the button and you will see a pop-up window. Insert the name, email and a name of the Company of a person whom you want to gift a free week of using our MLC PowerPoint Add-in.

After clicking “Gift a License“, you will see a confirmation that the gift was sent successfully.

After that, we will contact the person, with whom you shared, to create a 1 week free license for him.
Let’s spread MLC PowerPoint Add-in for better efficency and productivity while making brilliant presentations.
Save Tons of Time with the MLC PowerPoint Add-in
As I have already mentioned, MLC PowerPoint Add-in is constantly enriching. We collect opinions, ideas and suggestions from our Team members and our clients to create new useful time saving functions for better results.
Do you have in mind a function, you think will skyrocket your productivity but it’s still not in MLC PowerPoint Add-in? Let us know in comments below and we might take Your idea for future improvements!
Comments on Design slides +300% faster with MLC PowerPoint Add-in