DON’T HAVE TIME TO READ THE ARTICLE? DON’T WORRY, LET ME SEND YOU A COPY
How to present a project effectively? If you’re wondering how to present a project, it means that your “baby” has finally reached that necessary stage of maturity that it needs to be shared with others.
Don’t get me wrong.
Your project could be a structured corporate plan or just a new idea to present to a fund for financing.
That’s right – the project might still be in its early stages, but it might be clear enough in your head to make you want to convince someone to support you.
How to pitch a project is the kind of question you typically ask yourself when you’re at the point where you need your neighbor’s support in order to move forward.

You may need funding from an investor, approval from a stakeholder within your organization, or simply support from people close to you.
More generally, you need others to approve your project.
I bet you’re not in a position where you want to accept failure.
What do you mean, Maurizio?
I mean that this project is so important to you that an unsuccessful presentation would have major implications.
If you were presenting at your company, it could affect your success, if you were presenting to a client, it could put the sale at risk, if your pitch was about a start-up and you didn’t raise the necessary funding… I don’t need to comment further.
In this article I’m going to take a broad stance and help you create the best presentation that will answer your initial question: how to present a project in an effective way?
I won’t focus on a specific type of project. So, if you have an important project to present and the stakes are high, you’re in the right place.
If, on the other hand, you’re looking for suggestions regarding a specific kind of project presentation, I’m afraid you’ll have to look elsewhere!
Ready?
Let’s start!
Storyline – The starting point for presenting a project
Where did you think we would begin?
First, you need to decide what information to communicate and in what order you want to communicate it.

Thank you, Maurizio!
Trust me, it’s not an obvious choice.
I’m sure, if I asked you where you would start to produce the relevant information of your project you would have your own idea.
However, if I asked you where it would be best to start and what information would be best to exclude in order to present a project, things would get a little more complicated.
Why?
Because of the simple fact that when the project is yours, everything seems important to you, and it is not easy to let go of certain pieces of information.
That’s when, in short, you find yourself producing a presentation crammed with content that probably no one will ever read.
Where do we start, then?
From people!
The basis of any good communication is your audience.
Let me ask you a question: what is your goal in presenting this specific project, what do you really want to achieve?
Let’s get into it.
If you want to convince someone to do something they wouldn’t have done without seeing your presentation, then you need to figure out how to change their mind or how to instill, in their mind, a new idea that will lead to a change.
It sounds hard?
Don’t let it scare you, follow me.
The questions you need to ask yourself before you start are:
- What is my audience thinking today (before presenting the project)?
- What would I like them to think tomorrow (after presenting the project)?
- What would I like them to do now that they have this new insight?

You need to instill a new awareness in your audience’s mind, so that they are ready to act in support of your project.
Maurizio, can you give me an example?
Here it is.
You’re introducing a potential new client to a service or product. If you hadn’t set up the meeting, he probably wouldn’t have bought from you.
Or maybe you’re presenting an internal company innovation project and you want your bosses to approve it, so you will finally have the opportunity to leave your mark within the organization and get noticed.
You might be wondering how to present a project to the European Union, how to present a project to a city council, and so on.
Whatever the case, you want people to do something they wouldn’t have done otherwise.
Therefore, in order to succeed you need to understand who you’re talking to, what your goal is, and why they should resist you.
Exactly!
Why might they disagree, not follow you, or even contradict you?
In Lean Presentation Design we call these resistances.

Resistances are anything that crosses your audience’s mind that can potentially hinder your project. Any time your audience has a thought that stands in the way of your goal, you’re facing a resistance.
Do you remember when, a few lines above, you were wondering what information to include in your project presentation?
Well, now you know which ones can’t be missed!
Which ones?
Haven’t you understood yet?
All the necessary information to overcome your audience’s resistances.
If you miss any resistance, you risk not to convince the audience to support your project.
Sometimes, if you’re lucky, you get asked questions.
Have you ever thought about what those questions are?
They are resistances that have not been overcome yet, but that the audience is ready to discuss.
In short, questions are great opportunities for persuasion!
Now that you know what can’t be missed within a project presentation, it’s time to define the order in which you should present your information.
When preparing a project presentation, we usually refer to a very convenient framework: the Lean Presentation Strategy Canvas

Have you ever heard of storytelling?
No, it doesn’t mean telling stories.
It means using the typical narrative structure of a story and applying it to your communication flow.
Where to start?
From the context!
We can’t assume that your audience is aware of the context. Or maybe it is, but giving a recap can certainly help, and maybe even be appreciated.
You’ll be the judge of how much and what context information is important to your audience to know in order to effectively introduce the next step: the problem.
Every self-respecting story captivates attention through moments of conflict.
Think about it.
When you’re watching a TV show or a movie, what are the moments that grab you to the point where you forget everything else?
They’re the moments of tension, the ones where the main character is in danger and you need to know how it’s going to end.
Until that tension is released, your attention is focused on the screen.
And here comes the solution, the hero survives and pulls it off once again. The solution plays a key role in releasing tension and triggering pleasure in the audience.

It is because of the pleasure associated with the release of tension that you are finally ready to tackle the following problem.
This is how the plot unfolds – alternating continuous cycles of problems/solutions.
Always keep in mind that directly presenting the solution is not effective, unless your audience is fully aware of the problem.
The next step is the Evidence, or credibility, section.
In this section you can use data, reviews in your favor, case studies, references and everything that makes you and your project credible.
If you are presenting a startup to an investor, the fact that you have already founded others and have obtained significant results increases your credibility.
If you are pitching a project to a bank and you can demonstrate that you have already worked in that industry and have a proven track record, you will gain credibility.
If, on the other hand, you are pitching a project to your own company, perhaps you will have data that supports your opinion, and the presentation will revolve around the quality of that data.
Last step – Call to Action.
If you want people to do something they wouldn’t have done otherwise, at some point you’ll have to ask them.
Your presentation was the opportunity to get them in a position to accept your Call to Action – now it’s time to close the deal.
If you’re interested in understanding the application strategies of the Lean Presentation Strategy Canvas, then you’ll enjoy my guide: “Business presentations: the ultimate guide to creating modular and effective slides”.
Be careful though, the Canvas is a model that must be declined according to each specific case.

I use it when I’m designing presentations for others, and the skill lies in your ability to decline it according to the context.
If you are presenting a project within your company – to your superiors, for example – in the Evidence section you won’t include information about who you are and what significant experience you have in the field.
They already know you!
On the other hand, if you are presenting to a new client, you will probably want to fill out the Evidence section with industry references.
The weight of each section of the canvas depends on your audience’s level of awareness.
Did you notice the different persuasion triggers at the bottom of the Canvas?
I won’t address them in this article, but I suggest you consider reading “Business presentations: the ultimate guide to creating modular and effective slides” if you want to learn more.
Manage expectations and introduce the next steps
I told you that the final step in presenting a project is the Call to Action.
Once you have prepared the audience for action, you need to give them that final push that will motivate them to act.
Is that all?
No, there is another fundamental component that involves managing expectations.
What is the step you should follow immediately after your presentation, and what are the ones after that? Usually, in business presentations we talk about the famous next steps.
But how do you present the next steps of a PowerPoint project?
So far we’ve talked about the importance of communication strategy, now it’s time to bring your project to life and visualize it.
So, how do you design the next steps?

I usually use PowerPoint timeline templates or Gantt charts.
Creating a timeline with PowerPoint
Timelines are a very effective slide template when presenting a project. They are timeline layouts often used to describe the upcoming steps.
This slide is often called a project roadmap, and is very useful to describe what is to come.
It’s up to your common sense to figure out which steps to include and which not to.
Always remember to include only the bare minimum within each of your presentations.
Less is more, and I’m not just saying that!
Have you ever created a timeline with PowerPoint?
If you know the right tricks it’s pretty easy, otherwise it can easily become a huge waste of time.
Come on, let’s make one together.
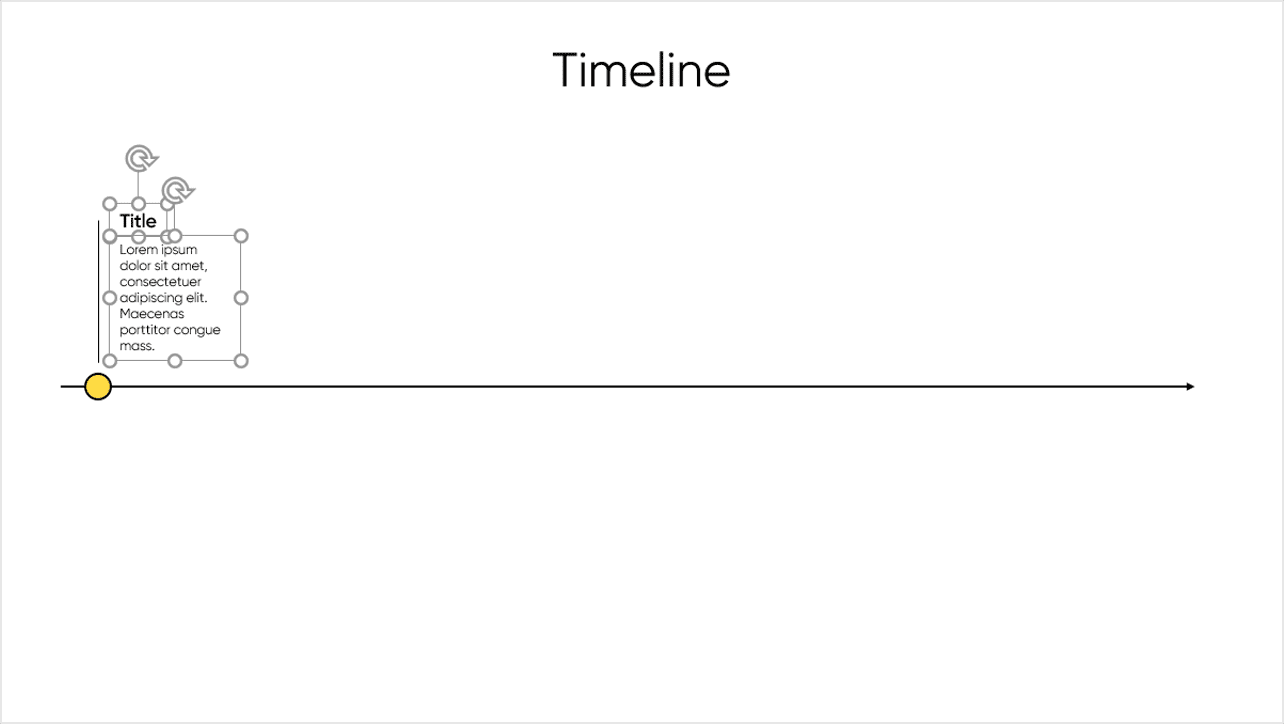
First, draw the timeline.

Did you get a crooked line?
You probably didn’t hold down the SHIFT key while drawing it.
Didn’t you know that?
If you hold down the SHIFT key while drawing a line in PowerPoint, the line will come out perfectly straight, whether horizontally or vertically.
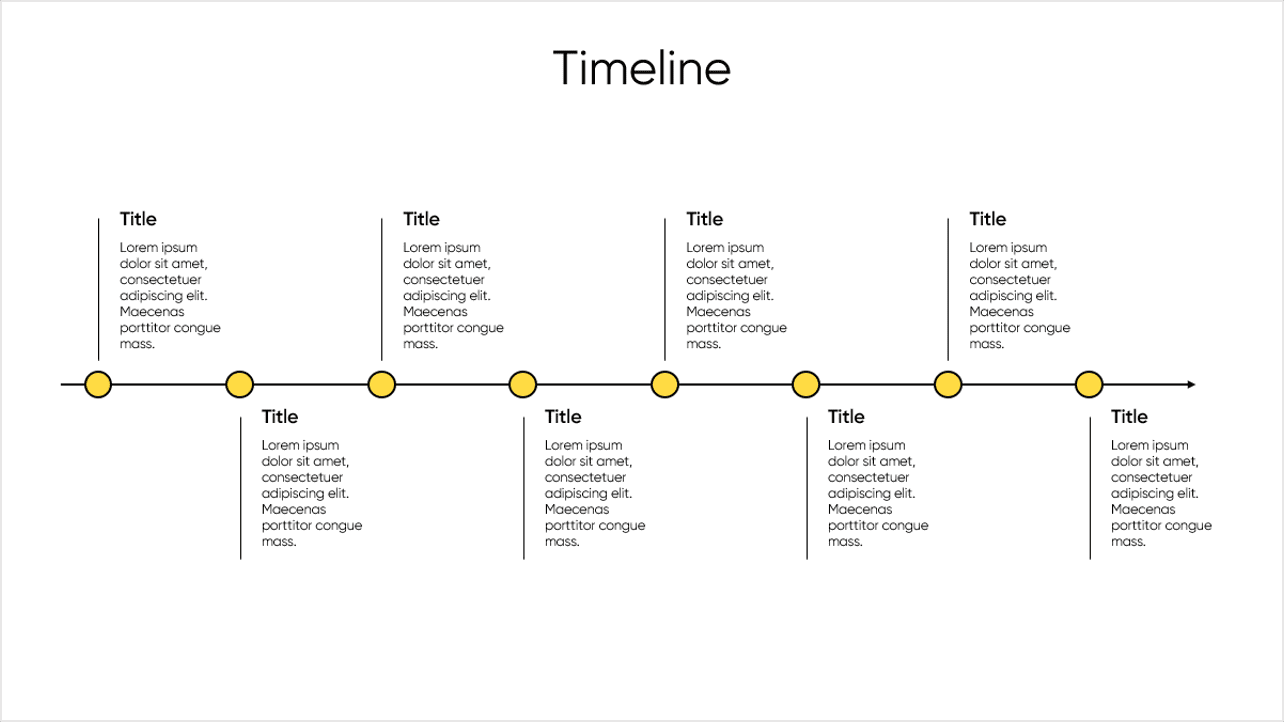
Create your first milestone.

Each milestone represents one of the next steps in the project.
Complete the milestone with a title and text.
Now we’ll mark the next few periods, but I’d like the milestone content to alternate above and below the timeline.
Just do a CTRL + SHIFT to duplicate the block:

And now by holding SHIFT you can vertically drag the contents of the milestone below the timeline.

Proceed with replication for a total of 8 periods.
Be careful, though!
In the end, the milestones must all be well distributed and centered with respect to the timeline.
Maurizio, your request is getting difficult.
Come on, let’s do it together.
Drag the first milestone while holding SHIFT to keep it aligned and CTRL to duplicate it as you move.
Use the pop-up distribution guides to make sure the third milestone is as far away from the second as the first.
Now all you have to do is replicate with CTRL + Y.
If you hadn’t heard of these shortcuts before, I’ll share with you something that will make you dream – my personal selection of PowerPoint keyboard shortcuts.
Sounds hard?
Maybe it’s a bit tricky, but with practice you’ll find that it’s actually easy.
If you have any doubts, come see me at our monthly meeting. Every month, I host a webinar reserved for our community, MLC Webinar Series. Follow me on Linkedin to stay up to date with public events and my upcoming speaking engagements.

If you don’t have time and would like to start from one of my ready-made timelines you can use my personal collection, available on MLC PowerPoint Add-in.

Just choose the timeline template that’s right for you and with one click you’ll have it in your presentation. My timelines have icons and text already built in, so all you have to do is edit out what you don’t like.
If you don’t have it, try MLC PowerPoint Add-in for free now.
If you’re interested in PowerPoint timelines, then you’ll certainly be interested in the comprehensive guide I wrote on the topic: Powerpoint Timeline Templates: how to create them best – give it a read!
Creating a Gantt chart with PowerPoint
A good solution to display the set of activities that affect a project is certainly a Gantt chart.
If you don’t know what it is, read my guide before moving on: PowerPoint Gantt Chart in Simple Steps.
Now that you know what a Gantt chart, let’s quickly create one with the support of MLC PowerPoint Add-in.
On PowerPoint, go directly to MLC > Gantt Chart and a small panel will open for quick creation of a Gantt chart that is ready to present a project.
For simplicity, enter 4 tasks and assign them starting and ending dates.

Now click OK – and your Gantt Chart is ready.

If you then want to modify it, just click on Modify Gantt in the right side panel to return to the diagram processing tab and apply your changes.
If you have one or more important moments to highlight on the project plan, you could insert milestones.

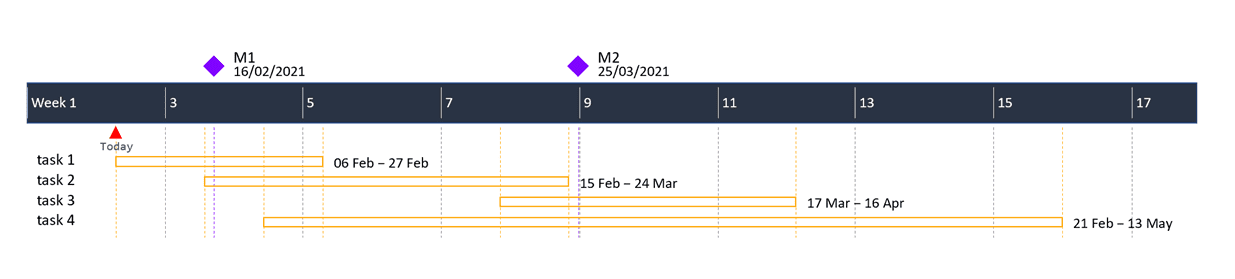
Last but certainly not least, remember that you also have the option of subordinating one activity to another.
That is, you can specify that an activity will start when the previous one ends.

You see how the last task, task 5, only starts when task 4 ends?

This way you can create a sequentiality between activities that are often interdependent in a project.
So, we have seen the use of timeline slides or Gantt charts to describe the next steps and map out a project so that you can effectively manage your audience’s expectations.
How to present a project – Progress Status
You thought you were getting away with the previous paragraph, but in reality, presenting a project is a recurring task.
What do you mean, haven’t I already presented it?
Yes, of course, but every project has progress stages that often need to be presented.
Imagine that your first presentation went well, and you persuaded your audience to support your project.
After a period of time, it will be natural to share the news and report on how things are going.
You may want to tell your investors how you closed the quarter. Or to one of your bosses if the project is on track in relation to the budget or the previous year.
In short, once you’ve earned the trust of your audience, you need to work on not losing it.
Updating the Gantt chart
The Gantt chart is designed to give you an always up-to-date view of how things are going.
In MLC PowerPoint Add-in, you can reopen the previously created Gantt chart and enter the completion status of each task.
See the little percentage to the right of the task end date?
That indicates the percentage of completion of each task.
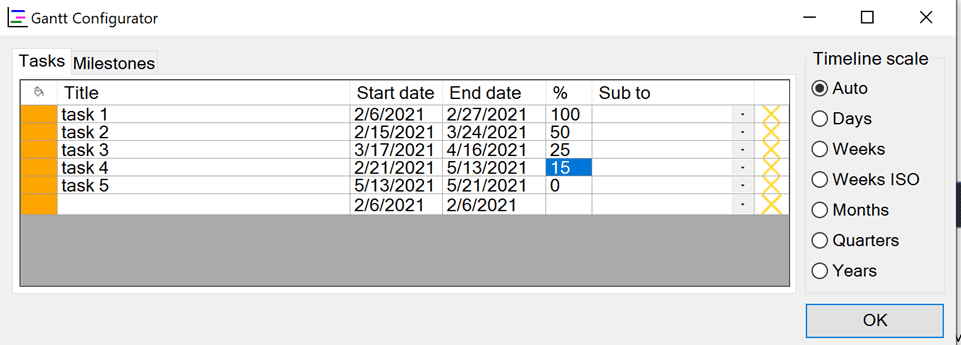
This way you have indicated that task 1 is 100% complete, task 2 is 50% complete, and so on. Click ok and boom, your slide is ready!

This way, you can reopen your PowerPoint and always keep it updated with the progress of your project.
Traffic light slides
What does a traffic light have to do with slides in PowerPoint?
If you’re wondering how to present a project in an effective way, you can’t ignore the use of the traffic light system to track and view your project progress.
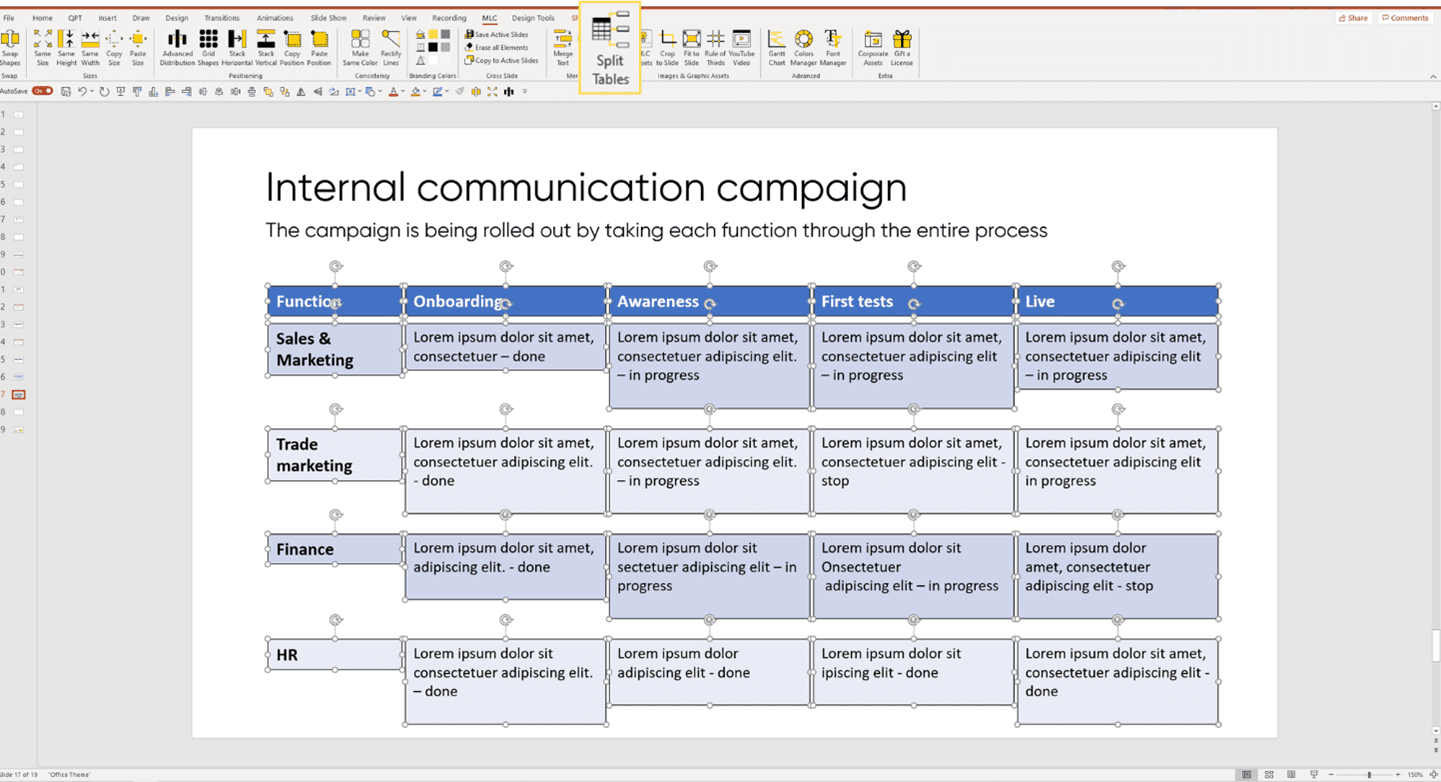
You have set up an internal communication activity that is directed at different business functions. The activity consists of 4 main phases: onboarding, awareness, first test, live and will involve 4 main functions.
Are you already thinking about a table?
Exactly!
Here is the result I would expect to see:
The 4 functions on the left, the column steps, and for each step some comments with the status inserted in the middle of the comment.

Which status, Maurizio?
Exactly!
Look carefully, and you will see that in every comment there is also the status.
You didn’t see it at all, did you?
This is a slide that I extracted from a project on which my team is working while I write this guide, it is a real case.
A traffic light system could definitely help.
Come on, let’s get to work!
If you’ve been following me for a while, you’ll know that I don’t like working with tables in PowerPoint because they’re awkward objects to manage.
It’s much better to work with shapes.
Turn the table into shapes right away with the Split Tables feature of the MLC PowerPoint Add-in.
First, we need to take care of the content by separating the descriptions from the statuses.
Why should we do this, Maurizio?
This step is essential in order to give the necessary visibility to the statuses which, as we noted earlier, are currently not sufficiently visible.
Remember that no design can ever make a slide effective, if you don’t fully understand its meaning.
As you can see, in this example it’s the understanding of the difference between status and content that allows me to make the first move.

Applying Lean Presentation Design means understanding that “less is more”. So, it’s time to clean up the slide of everything that’s unnecessary.

Usually, the first thing we need to eliminate are borders and fills.
Now, let’s put things in order by organizing the contents on different reading levels and adding our famous traffic lights.

Cleaner, right?
Let’s say it’s something else entirely!
Note that there is no need to write down the status of each project because the traffic light is already a convention in itself. Anyone, looking at this slide, would be able to understand which projects are completed, in progress or blocked.
How to create and manage a traffic light icon with PowerPoint
The traffic lights I used were not downloaded icons, but rather built by me using PowerPoint for maximum flexibility.
What do you mean for more flexibility, wouldn’t it be better to download a ready-made icon?
No, it’s better to build it yourself so that you can easily switch between lights off and lights on.
Maurizio, what are you talking about?
Don’t worry, I’ll show you.
To build the traffic light I draw a rectangle with rounded edges and then three small circles.
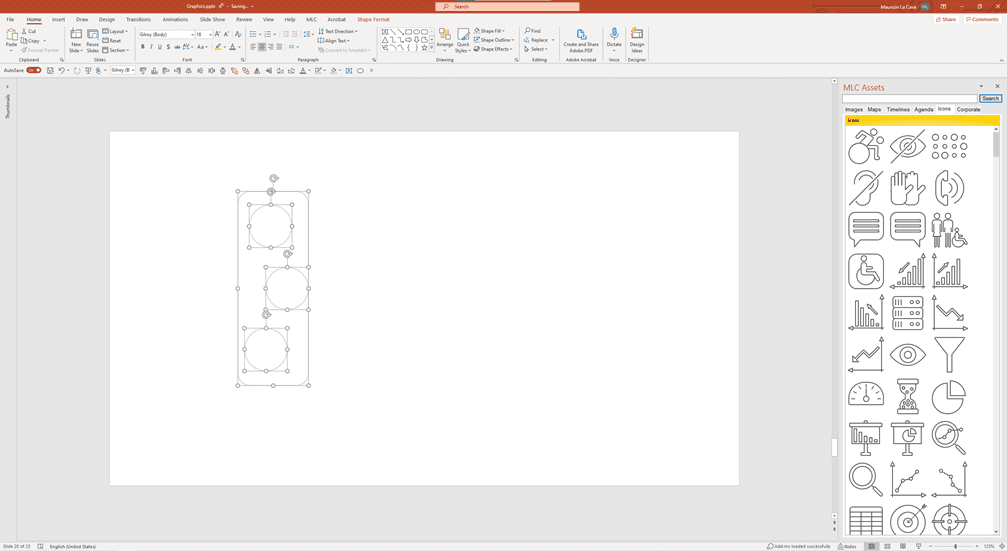
I now center and distribute them using PowerPoint’s Quick Access Toolbar.

I duplicate it by dragging with CTRL and then replicate the dragging with CTRL + Y.
Maurizio, I can’t remember all these shortcuts every time.
So you haven’t downloaded the collection of my favorite PowerPoint shortcuts yet: The Best PowerPoint Shortcuts.

Let’s go back to the duplicating our little traffic lights.

Now simply click on the three circles to create the three different icons.

If you wanted to quickly move a circle from one position to another after placing a traffic light, just use the PowerPoint Swap Shapes feature of the MLC PowerPoint Add-in.

Now color the middle circle, and you are done!
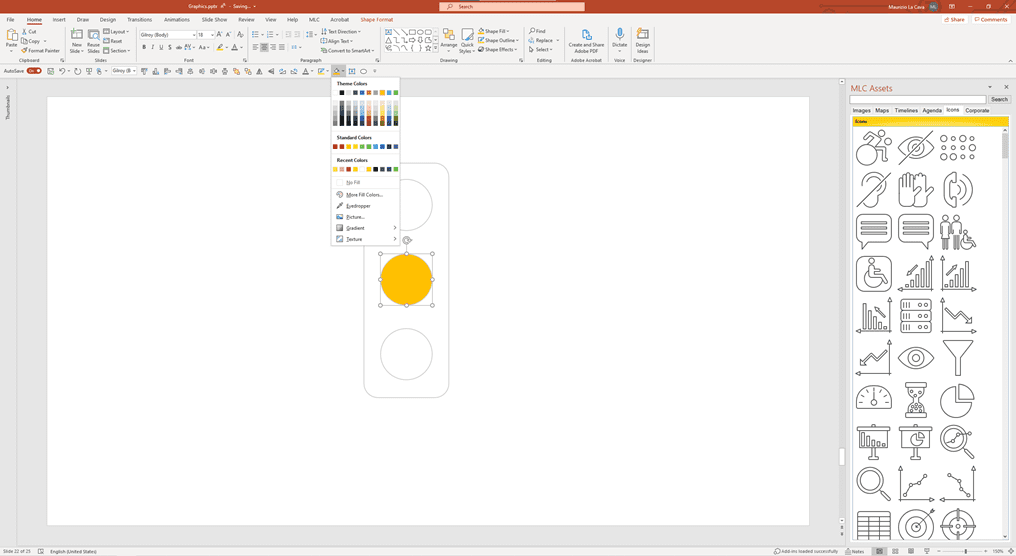
As you can see, creating a traffic light in PowerPoint is a breeze, and it allows you maximum flexibility in status management.
But if you don’t want to create your own icons of traffic lights, you can use the ones my Team created. You just need to have MLC PowerPoint Add-in and you’ll get access to the lean icons in our Graphic Libraries.

In conclusion
Organized project management requires you to be able to present progress and manage your audience’s expectations.
Sometimes you just need a simple timeline, other times you need more complex structures like the famous Gantt chart.
These are recurring slides, very powerful and easy to create on PowerPoint – if you know the right techniques.
A great strategy is to make use of well-known conventions such as traffic light systems to show the progress of each project on the fly.
Do you ever design slides like this for your project management? Is there any layout you’d like me to cover to enrich this article?

Some illustrations were taken from Freepik and modified by MLC Design Team
Comments on How to Present a Project effectively