

Have you ever seen a very good colleague working on PowerPoint, only to be struck by something he does, and you don’t understand how he did it?
You know, those gestures, those functions or shortcuts that surprise you and that if you’d known them before, you would have saved a lot of work time? I’ll show you 10 PowerPoint Hacks you’ve never heard of.
With time and experience, I have learned countless functions, generally by working directly on PowerPoint presentations and also by answering specific community questions.
So, I decided to create a list of PowerPoint tricks that, in my opinion, are more interesting and can really change your life, saving you an important amount of time.
From now on, I’ll update this list every time I discover a new, interesting trick. So, do not hesitate to give me some suggestions!
Let’s start.
PowerPoint Hacks You May Not Know About
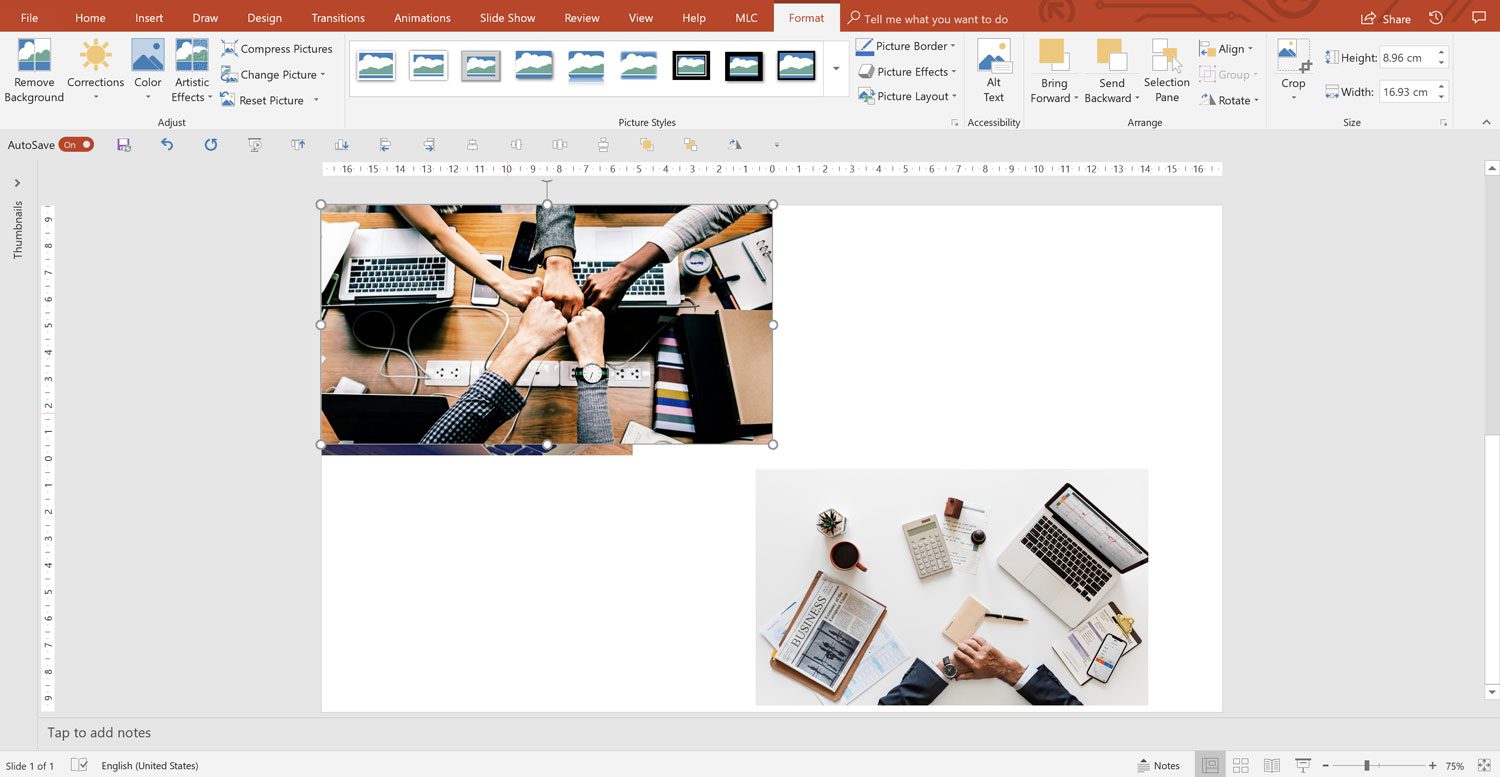
1. Make multiple images the same size
If you have two or more images of different sizes and proportions and you want to make them uniform in size, how do you do it? Here’s one of our PowerPoint hacks to make it fast and easy.
In the article Free images for PowerPoint presentations: the definitive guide, I explained how to use proportional Crop images in PowerPoint which, in my opinion, is a very useful technique in many situations and fits well in this case.
Let’s see an example.
I pasted 3 images of different sizes and proportions.

To make them all the same size, traditionally, you just have to choose the reference image and then re-proportion the cutouts of the other 2 on the dimensions of the first.
To do this, the only solution would seem to be overlaying the images to be cut out on the first image and manually proportion the cropping frame.
I remind you that the frame is recognized by the black handles around the image. Do not confuse it with the image handles, the white dots, which are used to resize the image itself (not the frame).
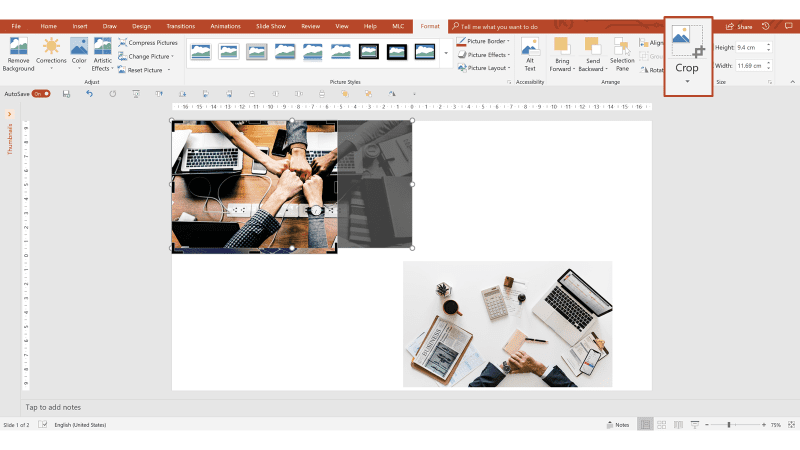
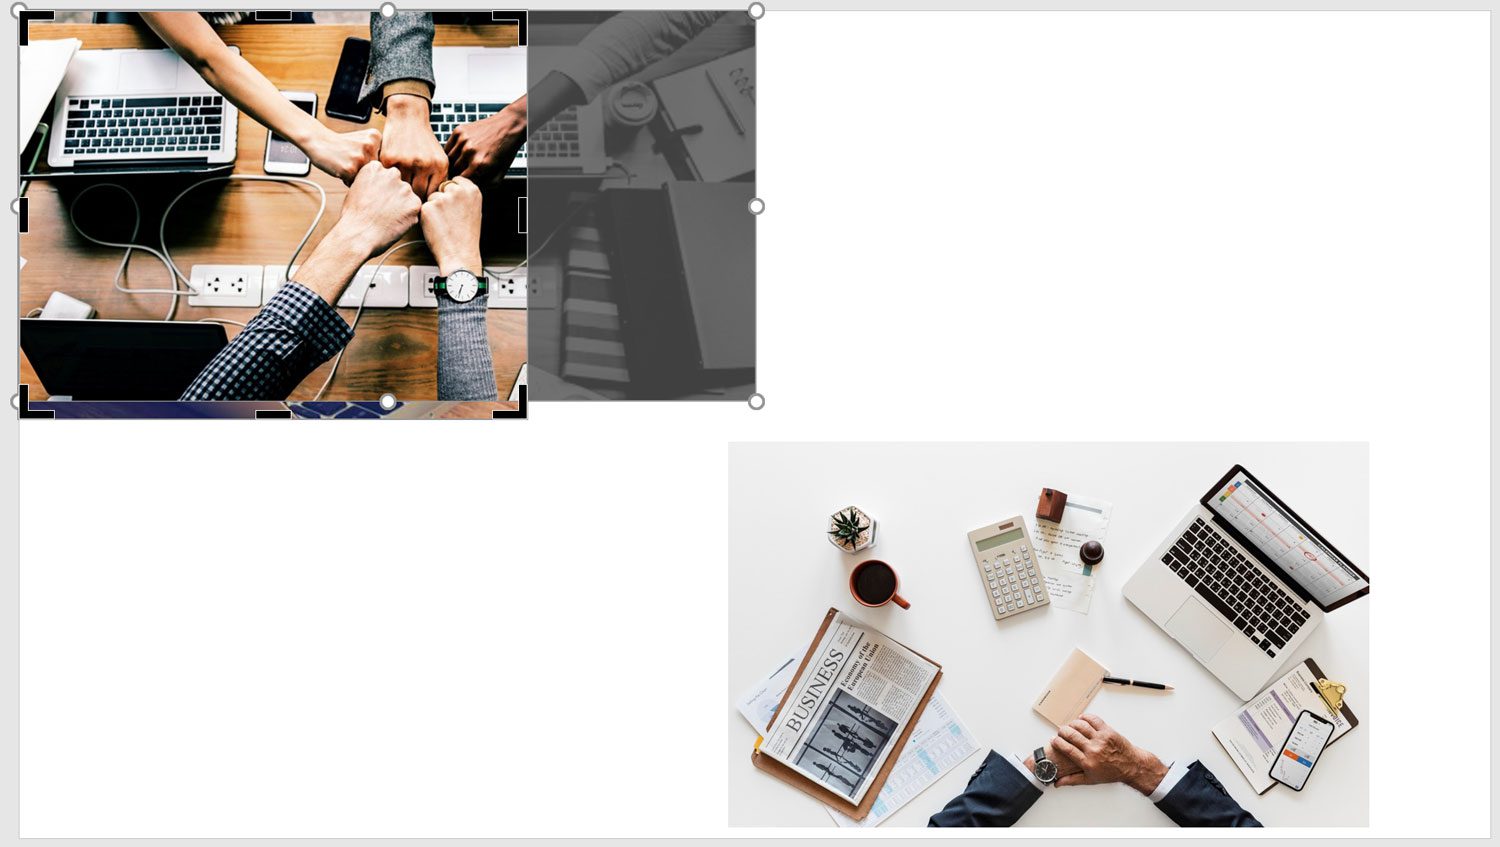
Note that I have matched the cropping frame with the dimensions of the image below.
Now I fill the cropping frame with the “Fill” command located inside the cropping menu, and the image will be centered and cut proportionally on the side edges so as to perfectly fill the cropping frame.

Repeating the operation, I get the same result and finally have the three alternatives re-proportioned, but there is a much smarter way.
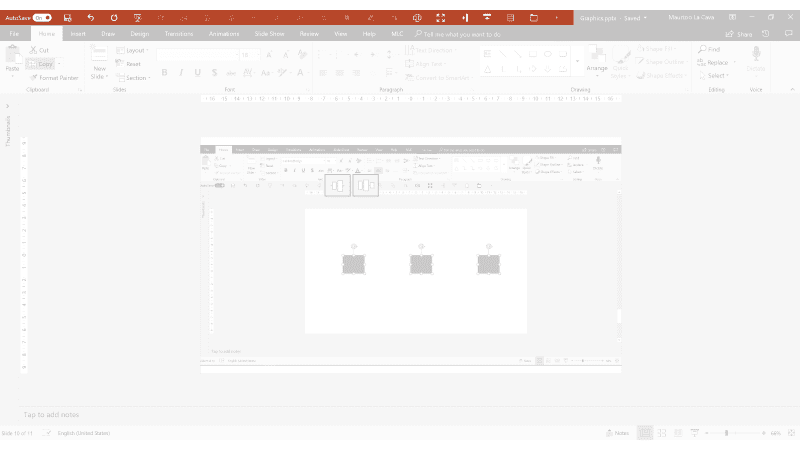
Select the three images and access the menu called “Picture Layout” which, to be clear, is a kind of Smart Art menu dedicated to images.

I recommend a simple layout to the images clean up, and you will soon understand why.


You will get a sort of Smart Art that cages the images, re-proportioning them and making them uniform in size.
In our case, the text and cage are superfluous, so we can eliminate them. With the right mouse button, divide the group twice.

If you have the operating system in English, the shortcut is CTRL + SHIFT + G to split the group while you can use CTRL + G to group.

Now select and delete the blue rectangles, retaining only the images.

As you can see, the re-proportioned images all of the same size. This technique can save you a lot of time when working with images in PowerPoint. Add it to the techniques presented in the complete guide of images in PowerPoint to complete your timesaving arsenal.
A special mention to my friend Taylor, from whom I learned this technique.
Taylor’s technique is not bad at all, but if you’ve started to know me, you know how much importance I give to efficiency, and this PowerPoint hack requires multiple steps to get the result.
Moreover, the technique works because the images are set as the background of some shapes, so the final result is not images, but shapes with your images as a background, and this affects the graphics quality of the images.
For this reason, I decided to develop my functionality to resize images in PowerPoint.
First, insert images from the MLC Assets panel directly into PowerPoint. If you do not know the panel, I invite you to consult the search section and insert images directly into PowerPoint article:

Note that I have chosen images of different sizes and proportions. The proportions of the images are an additional problem compared to the shapes that, in fact, can be more easily resized.
You do not want to unmask an image by applying the proportions of another!
Let’s try to apply the dimensions and proportions of the image of the tiger to the other two.
I select the image of the tiger, select the other two and then use the “Make Same Size” button of the MLC PowerPoint Addin.

The images will be immediately resized proportionally.
Now I want to talk to you about the next point, so I’ll leave you to examine the MLC PowerPoint addin on the reference page.
Write to me if you have any questions.
2. Keep everything at your fingertips with the Quick Access Toolbar
Among the most-used PowerPoint Hacks by those who work professionally in PowerPoint, there are alignments and distributions.
Let’s take the example in which 3 shapes sit on the same slide and you want to align them vertically with respect to their center.
How do you do it as quickly as possible?

Let’s see the necessary steps. After selecting the three shapes, you have to open the “Arrange” menu and then the “Align” sub-menu to be able to click once on the “Align Middle” alignment (x1 click + x1 Submenu + x1 click).

You have aligned them, now suppose you also want to distribute them.
Open the “Arrange” menu again, the “Align” sub-menu and, this time, select the horizontal distribution button.

Finally, the three forms are aligned and distributed, but it has certainly not been efficient. Want to see what would be really efficient?
Look under the main ribbon of my PowerPoint, do you notice something?

Enlarged for clarity, this is my “Quick Access Toolbar” (QAT).

Do we try to redo alignment and distribution with the functions available just a click away?
I select the shapes and I click on the two buttons Align and Distribute. Very simple!

What am I suggesting?
If you have not already done so, this is the time to set up your Quick Access Toolbar, and that should include a set of basic features, arranged in a specific order to enhance your efficiency in PowerPoint.
Once you understand how this amazing tool works, you can even customize it by adding all the features you want.
Let’s start by opening your “Quick Access Toolbar” which, unless you have already undertaken customization, will be on top of the ribbon.
Do you see that little arrow at the end of the features?

That is the arrow you need to open the “Quick Access Toolbar” settings. In fact, clicking on it opens the menu that shows you some of the main commands that you can include in the QAT, simply by ticking them and then the “More Commands” option.
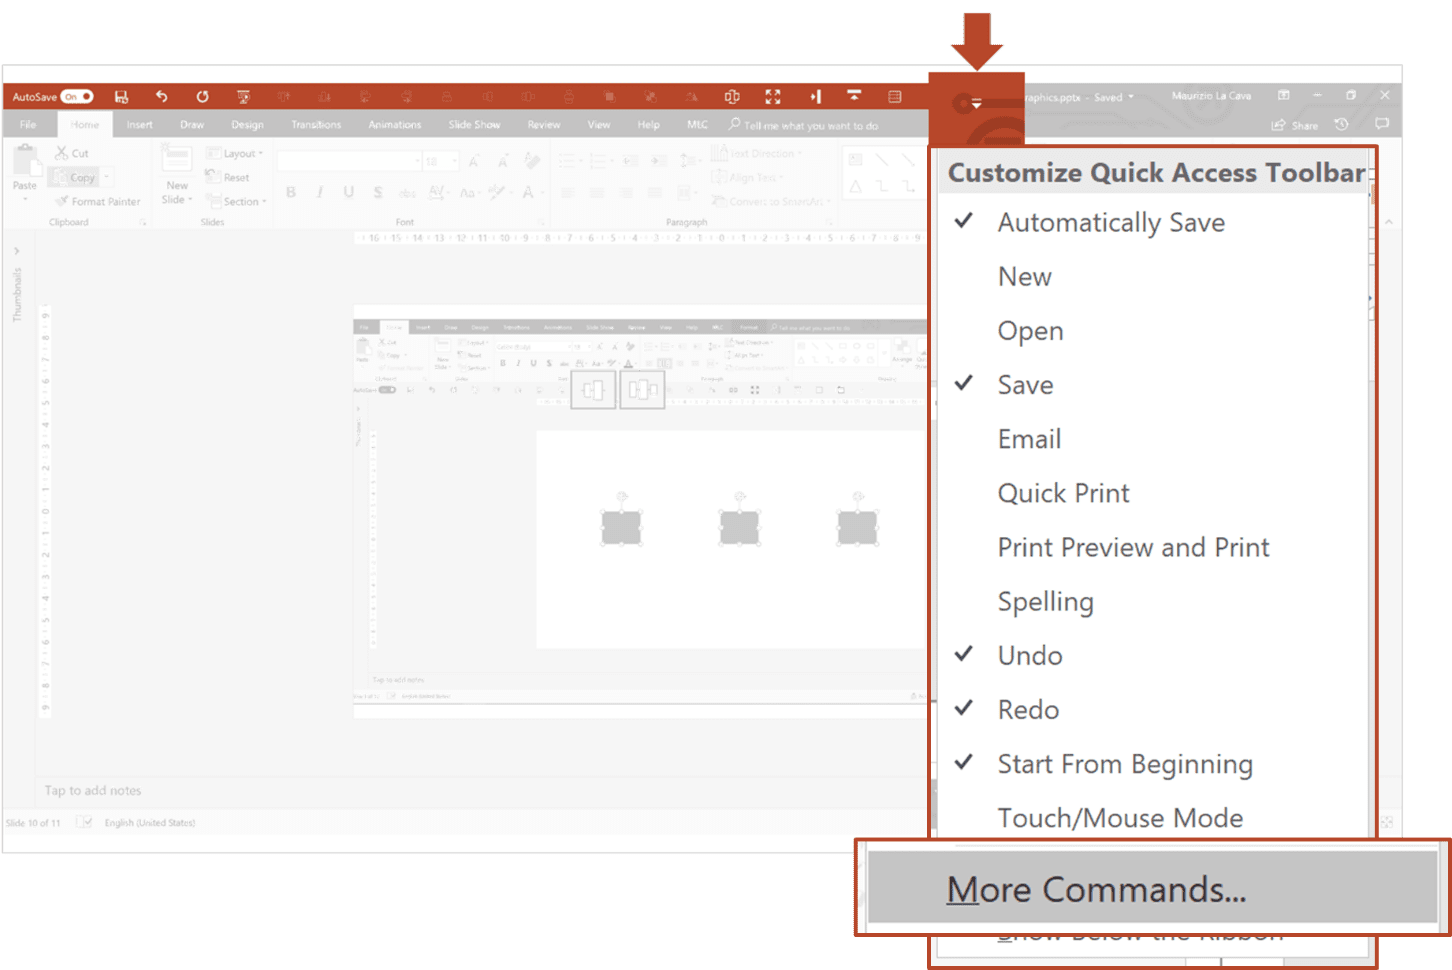
By clicking on “More Commands”, you can access the QAT administration panel.

The functions box on the left shows all the most popular PowerPoint commands (Popular Commands), while the box on the right shows the commands included in the QAT.
The first 5 commands of my QAT are automatically inserted by PowerPoint; the others are those that I have inserted and distributed, those on which we will focus.

Do we set your QAT by copying the basic functions from mine?
For me, the basic functions are all the alignments, the distributions, the door forward and the back door.
First of all, I advise you not to look only at the most popular commands, because you will not find any alignments or distributions. Replace “Popular Commands” with “All Commands” to display a list of all the commands in PowerPoint. There are plenty of other PowerPoint hacks to work with here!

To move a command from the left box to the right one, simply select it and then click on the “Add” button.
Look for the first alignment button in alphabetical order.

Click the “Add” button repeatedly to add all 6 alignment buttons to your QAT:
1. Align Object Bottom
2. Align Object Center
3. Align Objects Left
4. Align Object Middle
5. Align Objects Right
6. Align Objects Top
The typical mistake is to add other alignment buttons that are not part of these 6 or to add the “Align Objects” menu that would add a little arrow with the list of all the alignments in the QAT, moving them a click away from you.
You can add the “Bring to Front” and the “Send to Back” functions from this same menu, in the same way. The purpose of these buttons is to allow you to quickly send behind or bring an object in front of you without going crazy with the levels.
Finally, all you have to do is add the function to rotate shapes 90° , which can often be convenient to have on hand.
Once you move the buttons into the box on the right, it’s time to rearrange them so you can always have them at your fingertips. For this reason, I suggest you follow the order I set up because after years of testing, it proved to be the most effective.
One last tip: move the QAT under the ribbon so you have it right near the work area and minimize mouse travel.

You can also watch my video tutorial on how to setup a Quick Access Toolbar.
Now you have the QAT set correctly, aside from the last buttons which are included in MLC PowerPoint Addin.

3. Quickly duplicate any object
You have an object on the slide and you want to duplicate it several times by arranging it in line with the first one. How do you do it? Are there any PowerPoint hacks to make it easy?


The most common answer is copy-paste (CTRL + C and CTRL + V). And then position by hand, or with the alignment functions at the desired point.

What if I wanted to duplicate it again? You just have to repeat the procedure.
There is a PowerPoint function called “Duplicate” and it is activated with the keyboard command CTRL + D.
Let’s see how it works.
When you select a shape and activate the CTRL + D shortcut, it’s as though you copy-paste the square.

Now position it manually, like you did before.

At this point, if you reactivate the CTRL + D shortcut, the square will be duplicated, keeping the alignment and the distribution (same distances).

Interesting, right? But I want to take it to an even higher level. In fact, this basic PowerPoint duplication technique has a problem, in that the first square has to be aligned manually.
I propose you the alternative I use.
Select the first image, hold CTRL (to duplicate) and SHIFT (to constrain the drag to the horizontal axis or abscissa).

Once positioned, you are ready to apply the great trick.


Try using the CTRL + Y combination, and the shape will be duplicated while maintaining distribution and alignment.
This advanced form of duplicating is more accurate than CTRL + D because, in this case, the restricted drag of the mouse is achieved thanks to the SHIFT button and, therefore, nothing is left to the free hand of the operator.
Do you have any other PowerPoint hacks for this?
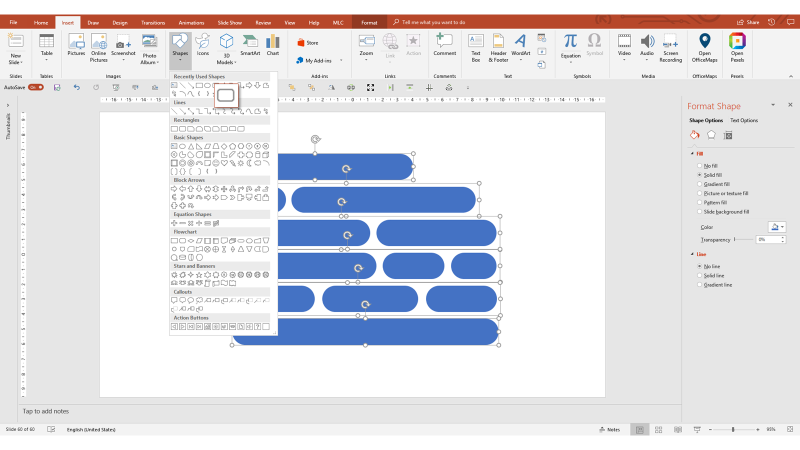
4. Getting rid of bullet points
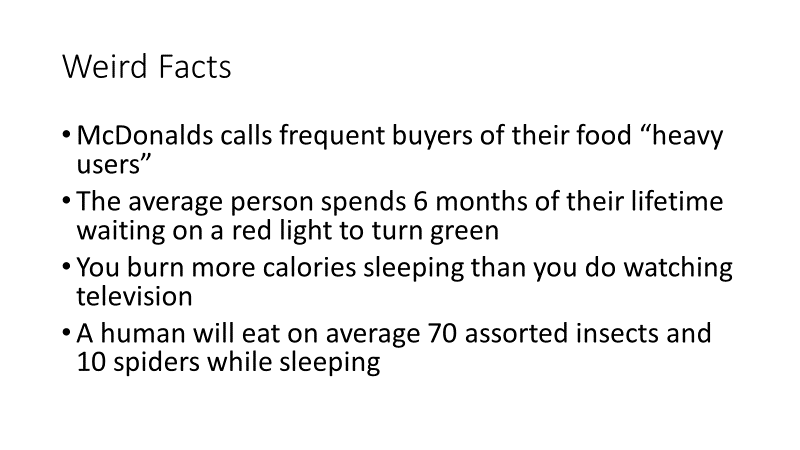
The classic bullet list is one of the most serious ills in PowerPoint. Here is an example.
We know that bullet points in presentations are not effective because they force the audience to read, distract them and cause the loss of attention that many speakers suffer because of their own slides.
One of our PowerPoint hacks is to fix the bullet point.
To solve a bullet point, the first thing to do is to independently manage each bullet point.
Are you wondering how to separate each bullet from the text box?
Certainly I will not tell you to drag the text sentence by sentence into new text boxes, because it would mean repeating an inefficient action several times.
An alternative is to convert the bulleted list into a SmartArt.
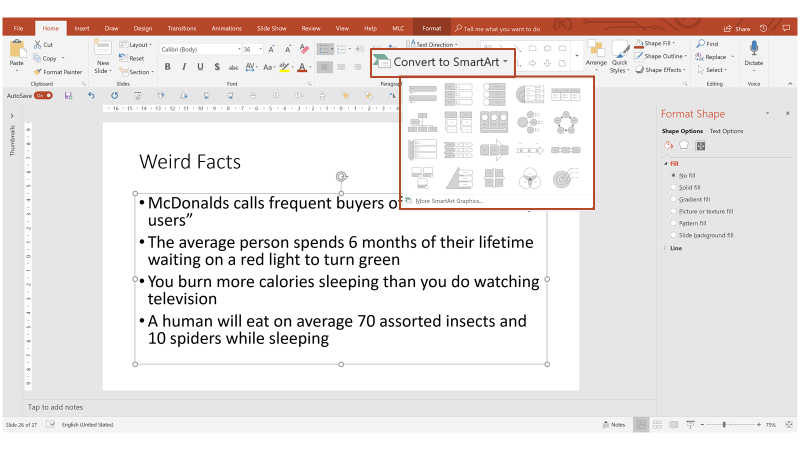

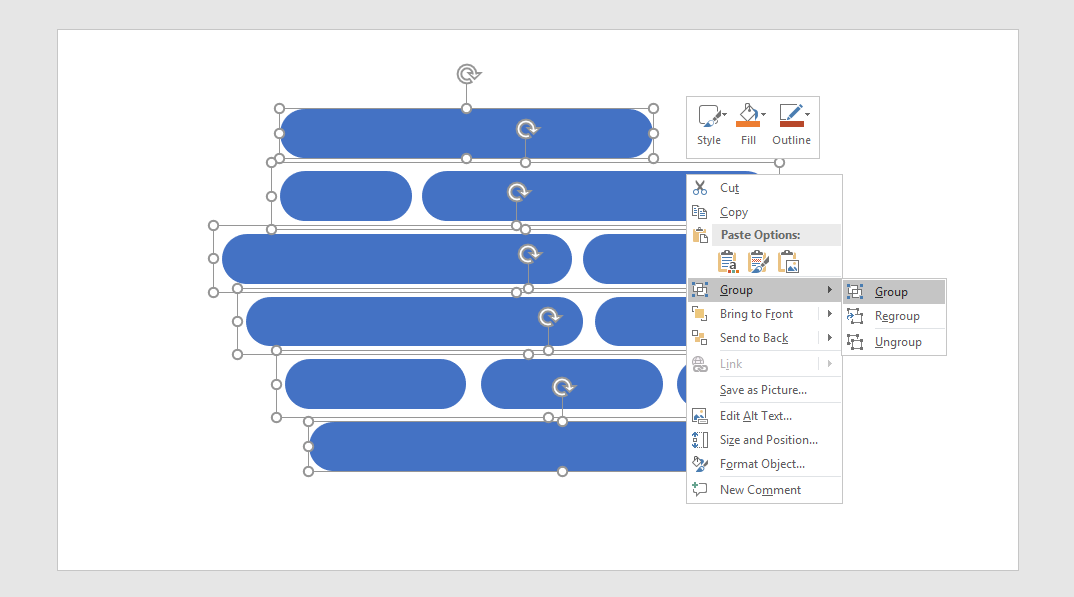
At first glance, it seems that you have caged the text in a model. In fact, all you need to do is split the group twice to get each separate point.
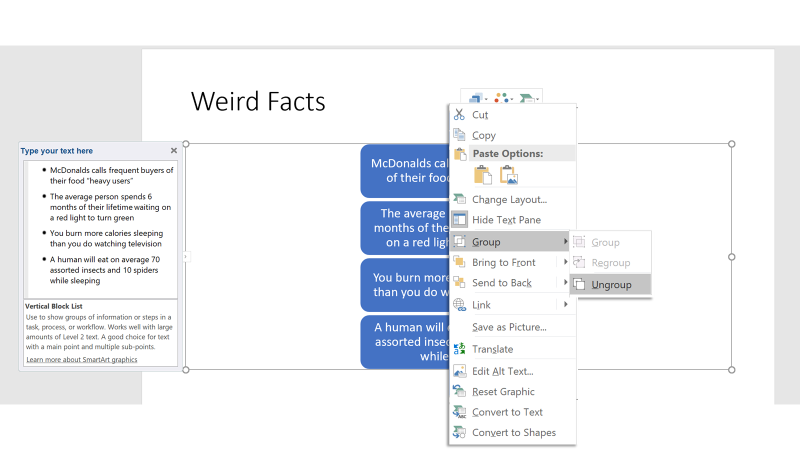
If you have the operating system set in English, the keyboard shortcuts are: CTRL + G to group and CTRL + SHIFT + G to divide.

To arrange them horizontally, simply drag the first one to the left, the last one to the right

And then combine the align and distribute functions.

I’ll show you first the distribute (function) that makes you better understand the dynamics of what I’m doing.
Now I can align center.
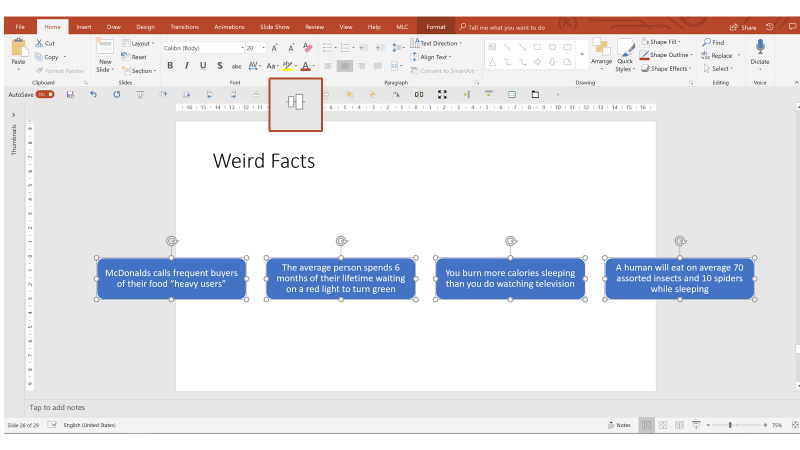
Now you just need to group the shapes and drag them inside the perimeter of the slide.

This procedure is certainly much more efficient than dragging any message outside the main text box.
However, dealing constantly with bullet points in the slides of my clients, I have developed an even more efficient alternative.
Do you remember the initial bullet point?
Just select it and apply a function that I have integrated into the MLC PowerPoint Addin, called “Split“. This function breaks the bullet point into independent text boxes in a single click (the “Merge” button obviously does the opposite).

For the arrangement, it could then be combined with the historical “Grid Shapes” function that is always present in the MLC ribbon.

To prepare the texts before applying the “Grid Shapes”, make them smaller and remove the bullet point.
Launch the “Grid Shapes“, setting the distribution on 4 columns and a row.

There’s still a trick I’ve used, and you’ve probably noticed that I have never closed the MLC ribbon, not even to make the text smaller.
How did I reduce the text without clicking on the button to make it smaller on the “Home” tab?
No, I didn’t use a shortcut.
In fact there are some very frequently used features (like font size change) on PowerPoint that do not have very practical keyboard shortcuts.
For this reason, I have provided myself with a very, very special mouse that allows me to be even more efficient when I work with PowerPoint.
Thanks to my very efficient friend Taylor, who taught me this hack.
5. Fixed page numbers (requires knowledge of the slidemaster in PowerPoint)
Have you ever had to add the page number to your slides?

In the PowerPoint default template, the page number is shown at the bottom right of the slide.
Do you remember how to apply the page number? Here’s one of our PowerPoint hacks to help.
In the insert menu, you will find two small buttons that open the same panel, from which you can check all the footers of your presentation.

The second panel entry concerns the page number.
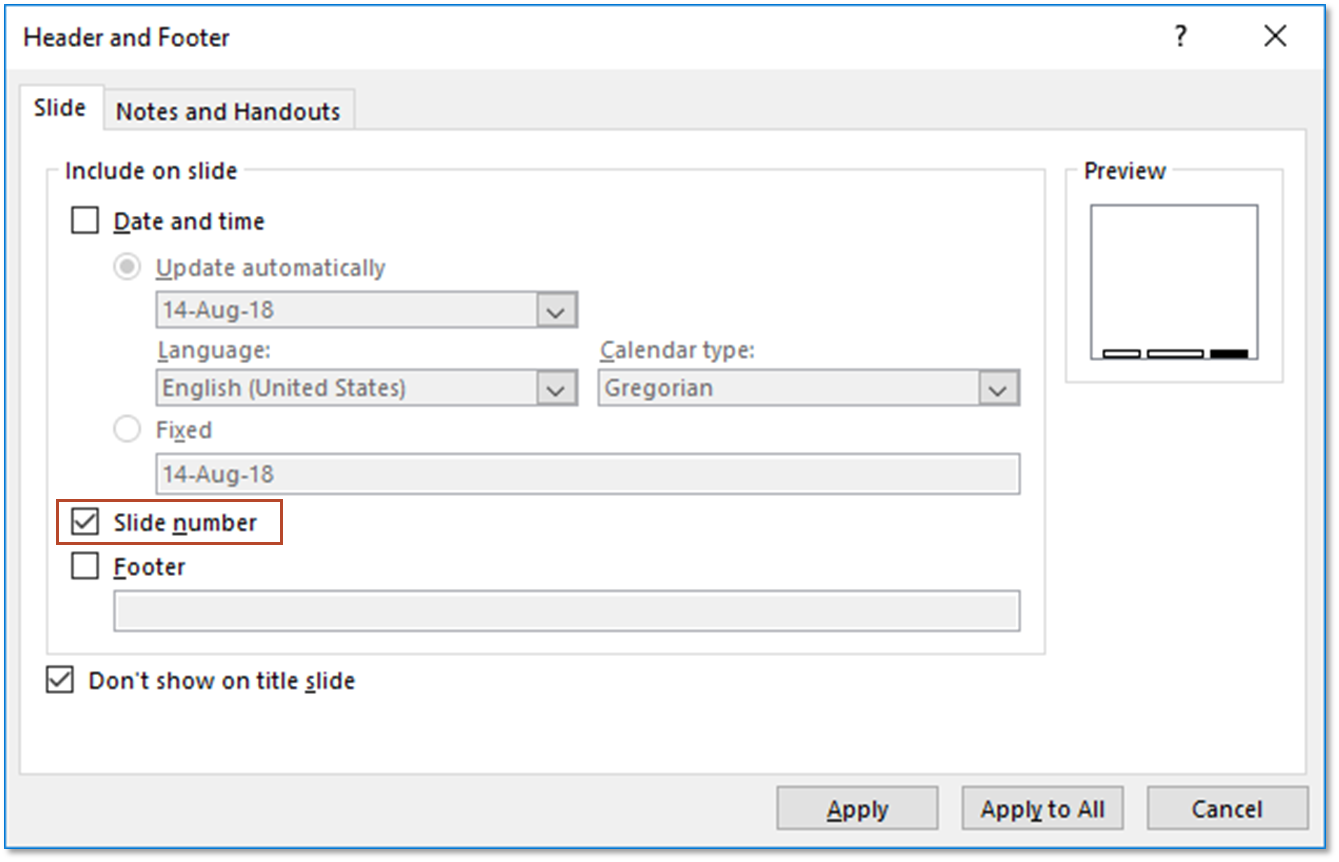
Once checked, just click “Apply to All” to apply the page number to all slides. To be precise, the page number will be seen in all slides that are linked to a layout in the master that contains the field footer (If you do not know what I’m talking about, it means that you’re probably losing a lot of time when you work in PowerPoint, so I suggest you learn what the slidemaster really is and how to use it – Slide Master PowerPoint: the Complete Guide to make the best use of it).
Another interesting check is the option “Do not show on title slide”, which allows you to hide the page number from the title slide so that it starts from the first slide.

This is very useful when you do not want the page number in the opening cover, and I expect that you don’t brutally delete it with the mouse, because it is a master placeholder that should be treated appropriately.
The page number is a very useful tool that I use often in my presentations, but it has a problem that I find very frequently.
When more people work on the same presentation, the page number ends up being modified or moved from its original location.
I would like to give you an example where each slide has a page number that is sized and positioned differently.

It’s not strange that something like this happens because the page number is a text placeholder, which it is easy to stumble across during the processing of a slide. Therefore, you may need to move it or resize a PowerPoint slide easily, and this can result in a dancer page number on your slides.
One day, during a training session, a person asked me if it is possible to set the page number in the master so that it could not move in normal mode when working on the slides.
Thanks to this input and a bit of testing we did that day, I discovered this useful technique, which I want to share with you.
To access the placeholder of the page number, you must enter in the slidemaster (I repeat that if you are not prepared on, you should look at Slide Master PowerPoint: the Complete Guide to make the best use of it).

When you enter the slidemaster, positioned on the first slide (the theme), look at the bottom right. See the page number?
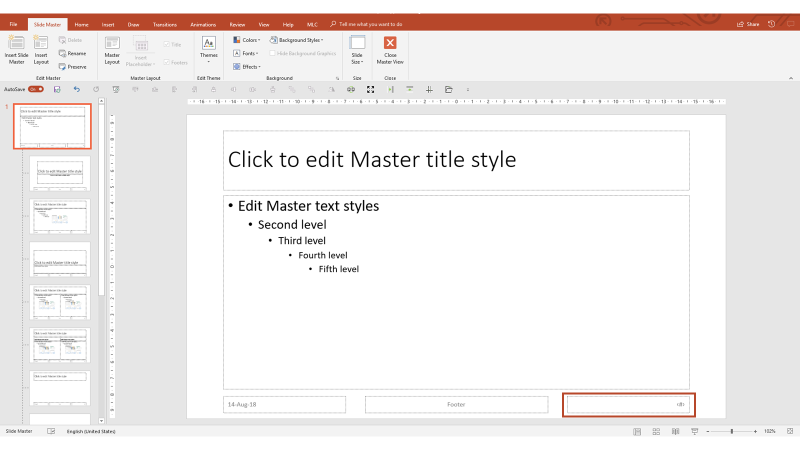
That is the placeholder of the page number.
The page number is a rather special placeholder; it is identified by a pound sign in quotation marks.
In fact, when you apply it to changing slides, it increases by +1 and counts the pages automatically. But, being a placeholder, if you click on it during normal view, you can easily modify it and lose its functionality.
In the example below, I selected it and wrote in it to show you how easy it is to change it.

How do you block the page number so that no one can change it while maintaining its functionality (that is, that it updates slide by slide)?
The technique consists of imposing the special field: a page number inside an object that you can modify only in the master that is a text box.
Enter the slidemaster and insert a text box (not a text placeholder). Place it just above the placeholder of the page number to let you see the difference once set.

Instead of writing in the text box, apply the special text field: page number.

Be careful: Applying the page number via the button directly in the text box is not the same as writing it by hand. If you write it by hand, it doesn’t work, as the complete, hidden formula is not built into the slides.
At this point, exit the slidemaster.

On the slide, you will have two page numbers: the placeholder indicated in gray, and your text box. Try pulling a selection box with the mouse and selecting them both. What happens?

The placeholder can easily be modified by anyone that clicks on it, while the text box is protected from any changes; the only way to change it is to enter the slidemaster.
Now try to create some slides and you’ll see that the number is updated progressively, just like the placeholder field.

With this technique, you have learned to protect the page number from accidental changes that may occur during the processing of slides, especially in presentations made by more than one person, with different needs and styles.
6. Learn how to manage layers in PowerPoint
Do you know that in PowerPoint objects can be overlapped on each other?
This means that PowerPoint thinks of objects as levels, so it is possible to create a scale of priorities according to what is above which object.
One of our PowerPoint hacks is to understand the best way to utilize these layers.

In the paragraph where we talked about the Quick Access Toolbar, we have placed the buttons “Bring to Font” and “Send to Back” at your fingertips just to be able to manage the front level and background.
What happens if I have more items and intermediate levels to manage?
In this case, the level management panel can be very useful. Do you know where it is?
You can find the layer management panel in the “Home” tab under the heading “Select”.

The panel shows you the order of the levels of the objects you have on the slide, from top to bottom. Those at the top are in front, while those at the bottom are in the background.
By clicking on the name of the levels, you can change the name.

You can change the order of priority simply by dragging objects within the panel.
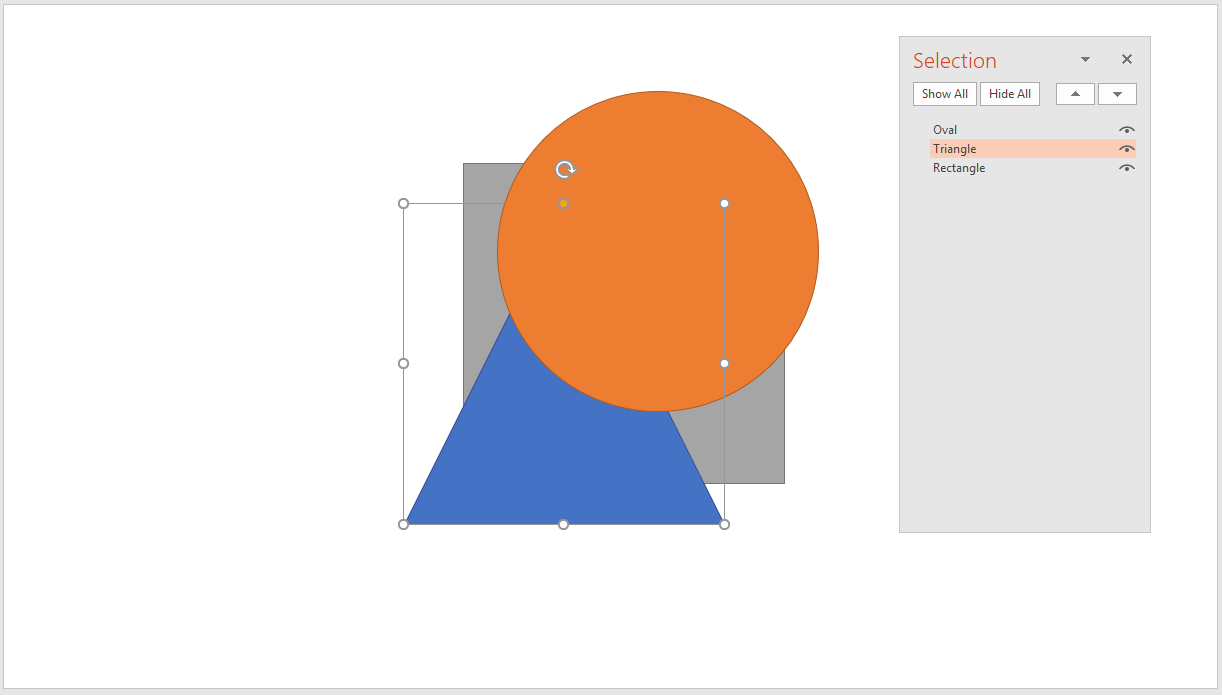
You can also hide some objects temporarily by clicking on the eye that is to the right of the level.

This function is extremely useful in cases where you want to lock an object once positioned, so you can work on everything else without clutter and then have it reappear at the end.
In the example in the picture, I could hide the oval that is in the foreground to work comfortably on the levels placed below, and then let it reappear in its place when I finish.
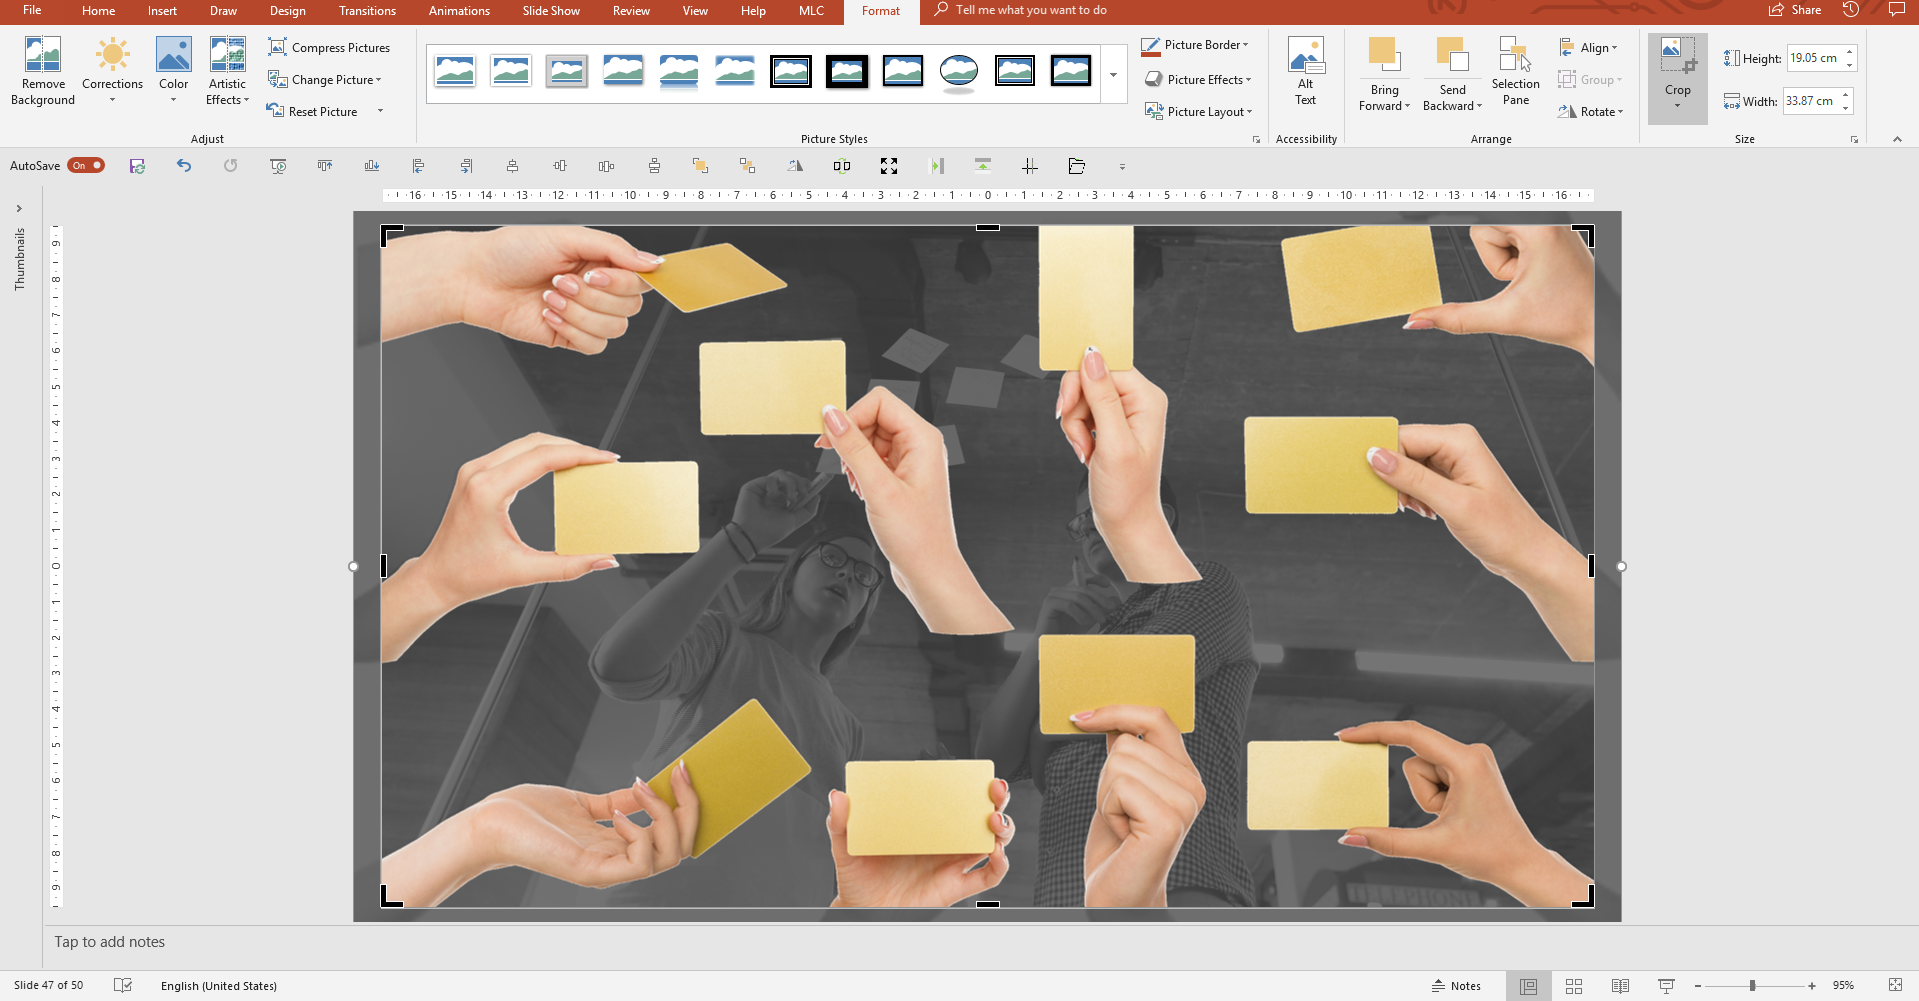
7. How to make a transparent image in PowerPoint
PowerPoint provides you with a good number of tools to edit images and customize them to make them effective

There is a technique that allows you to set a certain level of transparency on images in PowerPoint on Windows – How to Make Images Transparent in PowerPoint. I extracted this technique from the definitive guide to use images, to share it in this list of very special techniques.
Making a transparent image is an exceptional technique to create compositions in which the background image creates the context and the overlapping image an enrichment.
Thanks to the transparency, you can get effects in PowerPoint for which you often use Photoshop.
Wondering how to do it?
Get a high resolution image to be placed at full slide on your slide (Access millions of free, high resolution images free from copyrights from MLC Images for Presentations).

Desaturate it, since we will keep it in the background and it has pretty bright colors. Keep this image in the background.
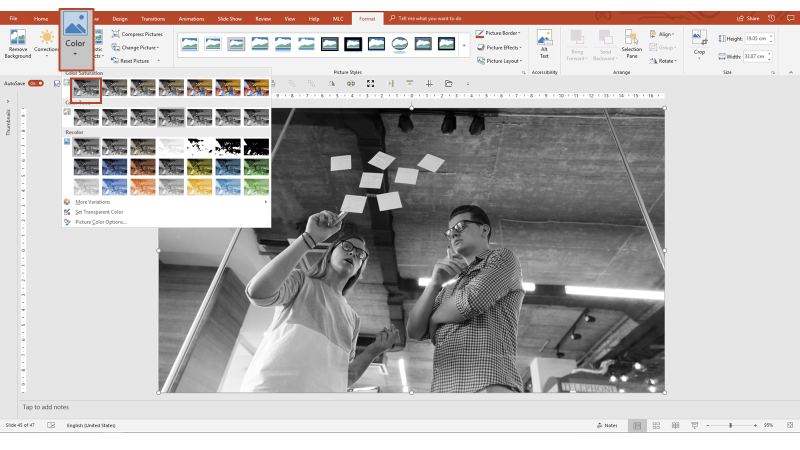
Now get another image to overlay the background and to which you’ll apply degrees of transparency.

Since this image represents a brainstorming and the principal object for each session of sharing ideas is post-it notes, I thought using an image of hands with post-its would fit.
I got an image with the white background so I can quickly remove the background in PowerPoint and keep my hands.
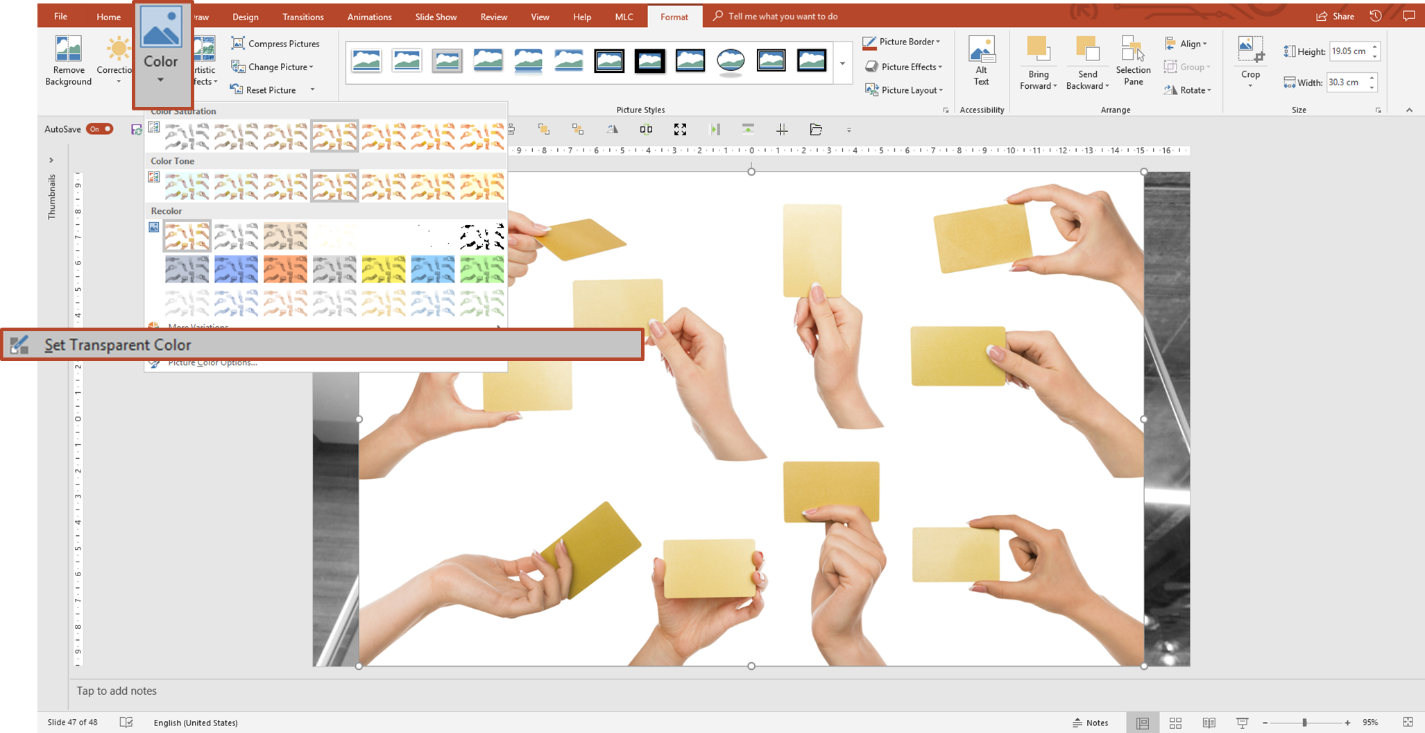
The PowerPoint background removal feature allows you to set a single color of the image to transparent. For this reason I need the background to be uniformly white.

In this image, I’ve removed the background, so I just have to size the image so that it overlaps the whole page.
Activate the cropping frame, drag it horizontally, while holding down CTRL on the keyboard, to cover the entire slide with a single drag.
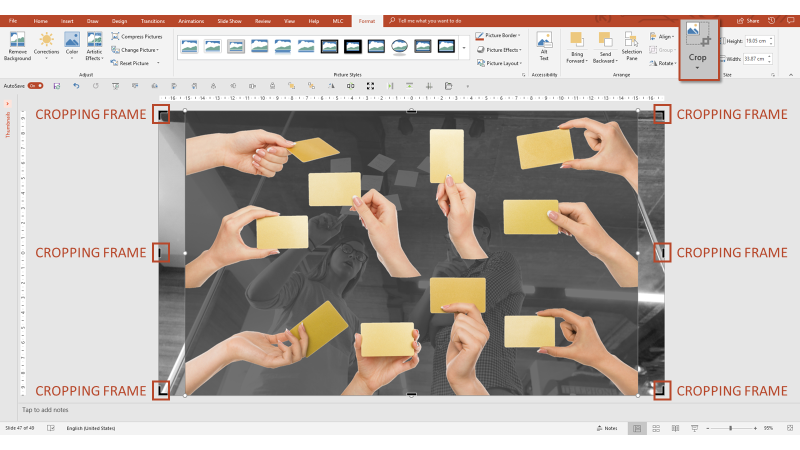
Now enlarge the image so that it fades the cropping frame and do not worry because all the parts that exceed the frame will be automatically cropped (note the black parts out of the frame).
Now it is time to give transparency to the image superimposed on the background.
Insert a rectangle.

Give the rectangle the same dimensions as the image. To do this you can simply drag the edges of the rectangle until they coincide with the image that, in this case, coincides with the edges of the slide.
To go faster, I like to use the Make Same Size function of the MLC PowerPoint Addin.


Cut the image to give transparency (CTRL + X). The image disappears but is actually saved in the clipboard. You just need to paste it with CTRL + V to make it visible again on the slide.
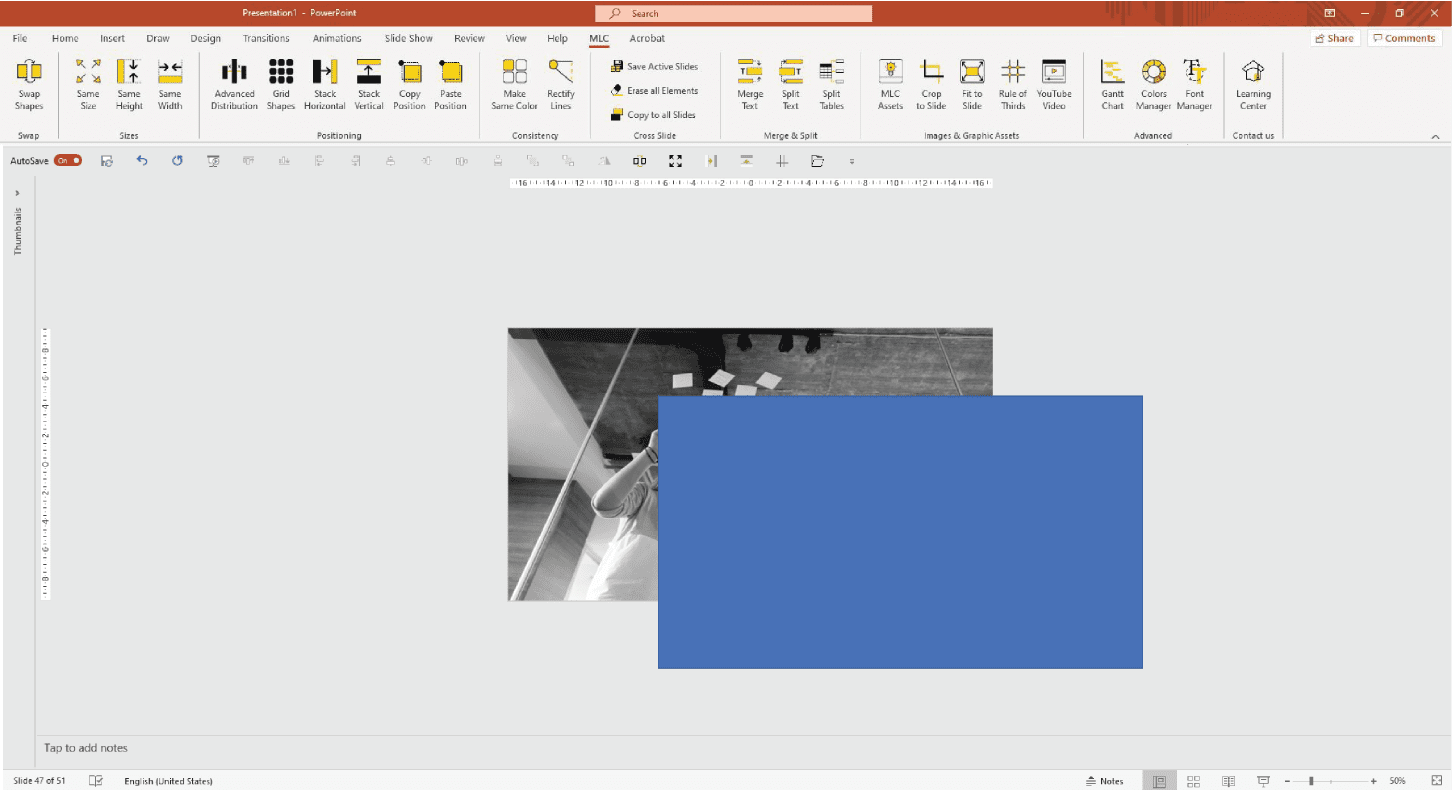
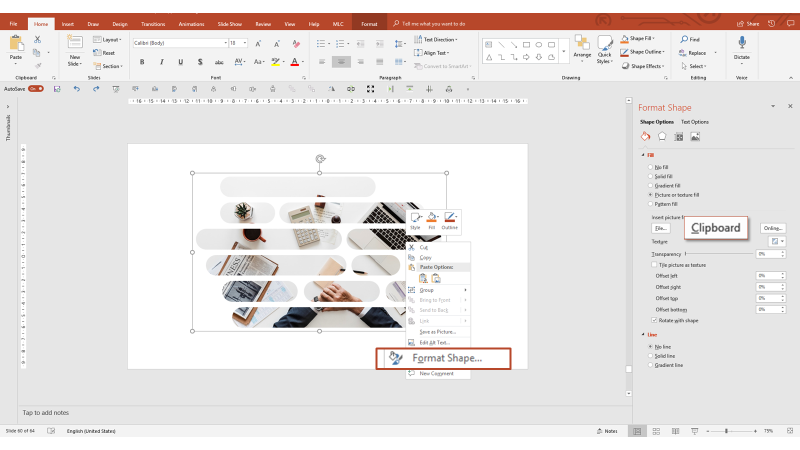
Select the shape with the right button and click on the “Format Shape” option.

Apply a background that is not the usual “Solid Fill” but “Picture or texture Fill” and indicates that it comes from the Clipboard.

Assign a background to the shape, to which you can apply transparency.

Here is your image that has acquired the desired transparency.
I showed you how to take the image from the Clipboard because I think it is the most advanced and interesting technique, but clearly you could take the image directly from a file, as shown in this video of Microsoft.
What do you think? Did you like this technique?
The last technique I want to show you is the simplest and it is useful only when you have to add trasparency to pictures.
All you need to do is to go to “Format” section, click on the image and select the grade of trasparency.

This technique is available only with the last update of PowerPoint.
8. Record videos in PowerPoint
Have you ever wanted to record a video of your screen while doing operations? Maybe you want to record a presentation, a course, or simply show steps to a friend or colleague on the other side of the screen. What software do you use?
There are many alternatives. The search for the easiest and most immediate free tool on Google to make videos often takes you on strange sites to download viruses, never really finding the tool you want.
Or you have to use a paid solution but, unless you are really professional, you are looking for a way to record your screen that is decent but not the best recording tool in the world.
PowerPoint has a feature that allows you to record videos of your screen or part of your screen, and then it makes them available in .mp4 format;
Too easy, right? In fact, it is!
In the “Insert” tab, there is a button called “Screen Recording” which allows you to record sessions of a selected area of your screen.

Note that the shot must not necessarily take place in PowerPoint; you could take a recording of everything you want out of PPT.
After clicking on “Screen Recording”, a small panel appears at the top of your screen with 5 main functions:
Record: Start recording.
Stop: Stop recording.
Select Area: Indicate the area to be registered.
Audio: Record audio or not.
Record Pointer: Record pointer movements.
Clicking on the red button start recording, imagine it as your clapperboard!

To stop shooting, if you lose sight of the small panel at the top of the screen, you can simply perform the keyboard combination WINDOWS + SHIFT + Q.

The video will be available on PowerPoint in the slide where you were working. You can use it directly in the presentation or save it as an MP4 and use it as you like.
9. How to create image templates in PowerPoint
If I ask you to transform this image:

Applying a set of templates in PowerPoint.

Can you do it?
I’ll show you another example to help you understand how much you can play with this technique.


I leave to your galloping fantasies more creative experiments, so I will explain the technique.
To create a template formed by many different shapes in an image, the first thing to do is draw the template with simple shapes in PowerPoint.
The set of shapes that I have designed represents the template that I will apply to the image.
For the technique to work, you must group all the forms into one group. Then select them all (CTRL + A) and then right click on Group> Group (CTRL + G for English operating systems).
All the shapes will now be grouped together in a single selection box.
Select an image, right-click on the image and click “Cut” (CTRL + X).

The image disappears from view, but is actually saved in the Clipboard.
Now select the template with the right mouse button, open the “Format Shape” menu and assign a background from an image taken in the clipboard.
As long as you keep the merged group, you can even edit the shapes within the selection frame, and the template will update in real time. You could even delete some shapes and change others. For example, you could change rectangles into circles.

Now it’s up to you to experiment with the technique of template, free your creativity and use it to amaze your audience.
10. Auto play videos in your presentations
When you insert videos in the presentation, must you stop your presentation to play it? You have to go to the PC and click on the screen to start the video.
I use a lot of videos in my presentations, especially during company training, because if they are used at the right point and without excess, they help to change the rhythm and advance the audience through the flow of communication.
The best use of a video in a presentation is to launch it at the exact moment when you stop talking, in order to create a continuity effect for your audience.
In order to do that, you certainly can’t think of going back to the PC, which may not be at hand, and launching the video.
Here is where autoplay comes to our rescue.
First of all, you have to insert the video into the presentation.

I advise you that always have the videos on your PC so you don’t have to worry about collapsing wi-fi or lack of connection on the day of the presentation.
Select a video and enter it in the presentation.

Click “Sequence” option to “Automatically”

Thanks to this option, when launching the presentation mode the video will start automatically when you will pass to this slide from the previous slide.
Try Out These PowerPoint Hacks
So, in summary, in this article I showed you the tricks which will save you a lot of time and make your presentations more efficient.
- Make a lot of images the same size only in few steps
- With QAT you can customize up to 5 commands according to your needs and duplicate an object with the shortcut CTRL + D
- You can delete bullet points and redesign cleaner, more impactful layouts
- Apply the page number to all slides also with the use of Slide Master
- Use levels in PowerPoint, changing the order of objects priority. This function is extremely useful in cases where you want to lock an object once positioned
- Use transparency which is an exceptional technique to create compositions in which the background image creates the context and the overlapping image – an enrichment
- Recording video in PowerPoint which can be extremely useful during a presentation and you can easily convert it in MP4
- Create an image template in PowerPoint using shapes
- Autoplay in presentation: it helps to change the rhythm and advance the audience through the flow of communication.
Key Takeaways
Resize Multiple Images Efficiently: Use the “Picture Layout” feature to quickly resize multiple images to the same dimensions, saving time compared to manual cropping and resizing.
Quick Access Toolbar (QAT) Setup: Customizing your QAT with frequently used commands like alignments, distributions, and rotations will significantly speed up your workflow in PowerPoint.
Duplicate Objects Precisely: The CTRL + D shortcut allows for quick duplication of objects, but combining it with CTRL + Y after manual alignment ensures perfect distribution and positioning.
Break Free from Bullet Points: Convert bullet points into individual text boxes or use the MLC PowerPoint Addin’s “Split” feature for cleaner, more engaging slide layouts.
Stabilize Page Numbers: Protect your slide numbers from accidental changes by embedding them in text boxes within the Slide Master, ensuring consistent placement and format.
Manage Layers with Ease: Use the layer management panel to organize objects by priority, lock layers, and hide elements temporarily, giving you full control over your slide design.
Create Transparent Images: Apply transparency to images by using shapes as placeholders for your pictures, allowing for creative overlays and backgrounds directly in PowerPoint.
Record Screen Activity: PowerPoint’s built-in screen recording feature is a convenient tool for capturing tutorials or demonstrations without needing additional software.
Design Image Templates: Group shapes to create custom templates for images, enabling dynamic and visually appealing layouts that can be adjusted in real-time.
Autoplay Videos Seamlessly: Set videos to autoplay within your slides to maintain the flow of your presentation, eliminating the need to manually start the video during your talk.
FAQs
How can I make multiple images the same size in PowerPoint?
You can make multiple images the same size by using the “Picture Layout” feature in PowerPoint. Select the images, apply a layout, and then ungroup them to achieve uniform sizing.
How do I keep everything at my fingertips in PowerPoint?
You can customize the Quick Access Toolbar (QAT) in PowerPoint to include frequently used commands such as align, distribute, and others. This helps in speeding up your workflow.
What is the shortcut for quickly duplicating any object in PowerPoint?
The shortcut to quickly duplicate any object is CTRL + D. This duplicates the object and maintains the alignment and distribution if used consecutively.
How can I get rid of bullet points in PowerPoint?
You can remove bullet points by converting the list into a SmartArt graphic, then ungrouping it. This allows you to manage each bullet point independently.
How can I make an image transparent in PowerPoint?
To make an image transparent in PowerPoint, insert a shape, fill it with the image, and then adjust the transparency of the shape. This technique can be used to overlay images for a professional look.
Sources
10 Essential PowerPoint Hacks For More Exciting Presentations
PowerPoint Hacks You Probably Didn’t Know
15 Powerpoint Hacks That Will Help You Save Hours And Wow Audiences
DON’T HAVE TIME TO READ THE ARTICLE? DON’T WORRY, LET ME SEND YOU A COPY
Comments on PowerPoint hacks you’ve never heard of
Investigations Toronto
I enjoyed going to your webiste. I leave comments rarely, but
you definately up deserve a thumbs!
David
Hi, I’d like to create a slightly bent/curved line that is NOT a shape with a bounding box, but still has two line end handles like a straight line or a connector. Isn’t that possible?